
Last session we learned about variables and functions, as well as conditionals and loops. These combined make up the basic elements of JavaScript. Now, we’re going to put these elements to good use by combining them with the character sheet we last touched in session 6.
Roll20 uses a limited subset of JavaScript called Sheet Workers.
Logistics
The JavaScript code you write will live in your .html file.
At the bottom of the file, below were we added the datalists, add a comment saying and the following code: <script type="text/worker"></script>. This script tag is a special HTML element that allows us to write JavaScript. We will put all of our code between these tags.
Do not forget the type attribute, or Roll20 will not run your code!
1
2
3
4
5
6
<!-- Scripts -->
<script type="text/worker">
    // This is JavaScript now!
    // All our code will go in here
</script>
Listeners, Revisited
A listener is a special function that is called when a specific event happens.
These events are most often an attribute changing value, or an element (such as a button) being clicked.
The simplest event is sheet:opened, which (as you might guess) fires whenever the character sheet is opened. This can be useful for setting default values, but probably won’t be something you need. The code for this listener looks like this:
1
2
3
on("sheet:opened", function() {
  console.log("Sheet was opened");
});
As you can see, it just uses the on() function that Roll20 provides. The first argument is the event we’re listening for (sheet:opened), and the second argument is the function that we want to run once it opens. Note that on line 3 we close the parentheses we opened on line 1, as well as the curly brace.
The other listeners we are likely to use are <attr>:changed and <button>:clicked.
Those look like this:
1
2
3
4
5
on("change:smash", function(eventInfo) {
    console.log(eventInfo);
    const newVal = parseInt(eventInfo.newValue);
    // Other JavaScript code in here.
});
 All of the attributes on eventInfo, accessible by calling
 eventInfo.<name>
Note: Even though “smash” comes from an input with type of number, note that
eventInfo.newValueandeventInfo.previousValueare both strings, and not numbers. That’s why it’s essential that we callparseInt()on line 3.
The “changed” event happens when the change is finished, that is once you tab or click OUT of the input box. Otherwise you would get an event on every keystroke. This means that if a player changes an attribute but leaves the cursor in the input box, that attribute will not be updated. This is an intentional design decision by Roll20.
The “Clicked” event is used to listen for a button being clicked IF that button has a type of “action”. Action buttons have a name that starts with “act_”, but (just like when referring to attributes) we ignore that part of the name in our listener.
A typical clicked event might look like this:
1
2
3
on("clicked:reset", function() {
    console.log("You clicked the button named act_reset, good work!");
});
We don’t pass an an eventInfo parameter here because there’s no interesting information that we want to use, unlike when a variable is changed. This event happens on a button click, and button clicks are pretty fungible.
It is possible* to listen for a button being clicked (like alt, ctrl, or shift), and change the behavior of the button accordingly. You can learn more about that on the Roll20 Wiki.
*At the time of this writing (12/29/22), this feature requires JQuery, and is not publicly available outside of the developmental server on Roll20. Trying to use it will not work (yet).
You can also check for multiple events at one time. To do this, simply add all of the events that you want listen for to one string, separated by a space:
Note that the events are called change and clicked, not changed or click.
1
2
3
on("change:sly change:cyber change:sly", function(eventInfo){
    console.log(eventInfo); // This will log whenever any of these attributes changes
});
This is useful if you want to do the same reaction on multiple different entry points.
But beware: even though any of these attributes changing can trigger the event, you’ll only get the details in eventInfo from the attribute that caused the change.
 Sly triggered this event, so there’s no info about Smash or Cyber.
Because of this limitation, it’s likely that you’ll want to use getAttrs() (below) to get the current values of any attributes you’ll want to use.
Listeners are the only entrypoints to your code being called.
Roll20 only provides these listeners here. While others exist within JavaScript, they are not available in a character sheet.
Get Attributes and Set Attributes
The two most important functions you will use are GetAttrs and SetAttrs. The Roll20 Wiki is an excellent resource for these methods (and using sheet workers in general).
GetAttrs is used to get Attributes (any named value on your sheet). It’s true that an OnChange event will have the value that changed, but you may wish to interact with other pieces of information, even if they didn’t directly change.
SetAttrs is used to update an Attribute with a new value. Later on, we’ll use this for our reload button, setting current Ammo of all weapons equal to that weapon’s maximum ammo.
The most important thing to know is that both of these functions are asynchronous. Let me explain:
Normally, JavaScript is executed synchronously, or one line after the next. In the below code, you can log name on line 2 and trust that it will have whatever value getName() returned, even if getName() takes a minute to finish.
1
2
let name = getName();
console.log(name);
NOT SO in async code!
Asynchronous code works differently. It fires off and doesn’t wait for a response. If you call an async function on line 1, line 2 will be immediately executed, without waiting for line 1 to finish.
So how do we deal with it?
Luckily, both getAttrs() and setAttrs() have something called a callback function. Don’t worry about it too much for now, but know that a callback function lets you tell JavaScript “Hey, once you’ve finished running my function, run this code afterwards.” This is incredibly useful, because the callback provides the return value of the method that was just called.
I know this is counter-intuitive to what we just learned last session, and if it’s not sticking, you can just follow examples without completely understanding how it works.
GetAttrs
getAttrs() takes two parameters: the first is an array of attribute names, the second is the callback function.
Arrays: An Array is a collection of one or more values. An array is defined with
[], and individual elements are separated with commas.For example:
let arr = ["A", "B", "C"]defines an array with 3 elements.You can access these elements like this
arr[0], with the variable name followed by theindexyou want to see. The index is a number starting from 0.arr[0]gives a value of “A”.
Remember that whenever we reference an attribute, we ignore the “att_” part of it. To refer to our attr_hp, we would simply use hp.
The second parameter is a callback function. This has one parameter, usually called values, which contains the results of the function. You will defined the callback function, and getAttrs will automatically call it when it’s done fetching the attributes.
A complete example might look like this:
1
2
3
4
5
6
7
8
on("change:hp", function() {
    getAttrs(["hp", "character_name"], function(values) {
        let name = values.character_name;
        let hp = parseInt(values.hp);

        console.log(name + " has " + hp + " hit points");
    }); // End getAttrs() callback
}); // end on() callback
Let’s break it down:
Line 1 is our listener, which we first saw last session and just revisited above.
Tip: If you’re wondering why the function on line 1 doesn’t have an
eventInfoparameter, then congratulations! You’re very perceptive. We could have included that (and used it!) here, but I wanted to focus on getAttrs instead.The function works the same way whether it’s there or not. If we exclude it (like we did), it just means we cannot use it (by checking
eventInfo.newValue).
Line 2 is our call to getAttrs. Note the array with two elements: this gives us the value of attr_hp and of attr_character_name. Then we have our callback on getAttrs. Perceptive readers will notice that this callback looks pretty similar to the one one line 1!
Lines 3 and 4 are just pulling data out of our callback. values contains all of the values that getAttr() fetched. Async functions don’t return the way normal functions do, instead those values are accessed in the callback (here).
Note on line 4 that we call parseInt() on values.hp. This is because values.hp will be passed in as a string, and if we want to do any math on this value, we want it to be a number. Remember: 2 + 2 = 4, but 2 + "2" = 22
Then on line 6, we simply use the values that we got, in this case to log them to the console.
A very similar example with our current sheet looks like this:
1
2
3
4
5
6
7
8
9
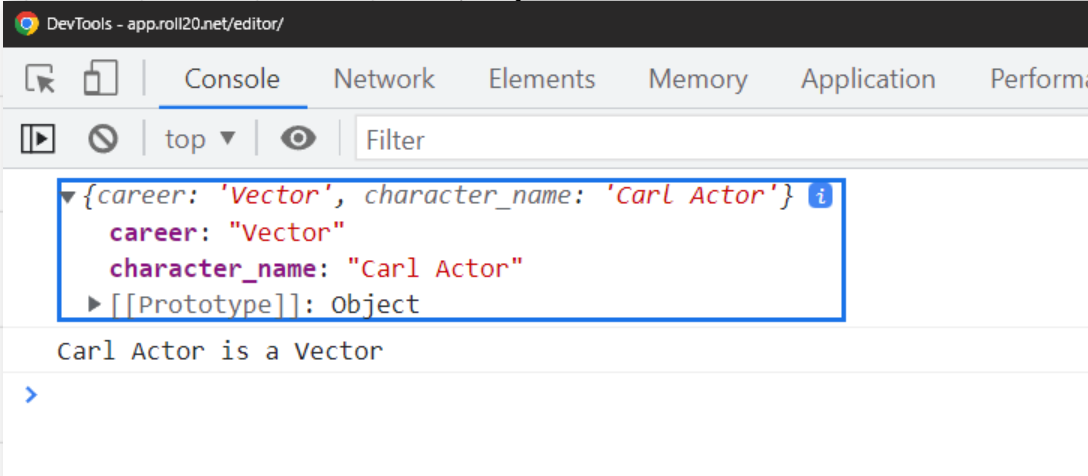
on("change:career", function() {
getAttrs(["career", "character_name"], function(values) {
console.log(values);
let name = values.character_name;
let career = values.career;
console.log(name + " is a " + career);
});
});
This code fires whenever the career changes and logs the value that getAttrs returns, as well as the parsed value. You can see the result here:
The big takeaway here is that if we’re using getAttrs in a listener, the rest of the code for that listener should be inside of getAttrs()’s callback function. Otherwise, it will not be able to use the results of getAttrs, and may execute in the wrong order.
SetAttrs
Much like how getAttrs can be used to get the current value of attributes, setAttrs can be used to update attributes with new values.
Warning! If you use
SetAttrsto update an attribute from within a listener on that same attribute, you will cause an infinite loop, which will crash your game. Don’t do this.If you MUST, then add
, {silent: true}just before your closing parenthesis on the call tosetAttrs.
Objects
We haven’t talked about objects in JavaScript, and I don’t want to get too into the weeds, so I’ll keep it brief: an object is a container that holds a number of properties. These are known as “keys” and “values”. A “person” object might have a key of “name” with a value of “Alex”. When we look at eventInfo, that’s an object with many keys (and corresponding values).
An object is defined by a pair of curly braces {} and a list of keys and values, each separated by a colon :. Multiple key/value pairs are separated by a comma ,.
Here is a simple object:
1
2
3
4
5
6
7
8
9
10
11

// Define an object
const person = {
    name: "Alex",
    age: 31,
    married: true
}

// Refer to its properties with .
console.log(person.name); // "Alex"
person.age++; // Age is now 32. Happy Birthday!
As you can see, the keys of an object are not surrounded by quotes of any kind, while the values can have many types (string, number, boolean).
Wait, we’ve been using
console.log(). Does that meanconsoleis an object?That’s right! Objects can even have functions as values, like
logis to theconsoleobject.
The reason I’m talking about objects now is because the setAttrs method takes in an object as a parameter.
1
2
3
4
setAttrs({
    smash: 5,
    hp: 0
});
The keys of the object are the names (without “attr_”) of the attributes you want to set. The values are the new values.
Note that the last attribute I’m setting doesn’t have a trailing comma.
Most often, you’ll want to call SetAttrs from within the callback function of getAttrs(), like this:
1
2
3
4
5
6
7
8
9
10
11
12
13
14
15
16
17
18
19
// Reset after each mission
on("clicked:reset", function() {
  getAttrs(["hp_max", "biotech_max", "barrier_max", "soak_max", "shard_max"], (values) => {

    const hpMax = parseInt(values.hp_max);
    const biotechMax = parseInt(values.biotech_max);
    const soakMax = parseInt(values.soak_max);
    const barrierMax = parseInt(values.barrier_max);
    const shardMax = parseInt(values.shard_max);

    setAttrs({
        "hp" : hpMax,
        "biotech" : biotechMax,
        "soak": soakMax,
        "barrier" : barrierMax,
        "shard": shardMax
    }); // Close setAttrs
  }); // Close getAttrs
}); // Close on
Using the callbacks
If you’re using getAttrs, you want the rest of your code to be in the callback of that method, like we discussed above.
HERE’S AN EXAMPLE OF WHAT NOT TO DO
If you do this, it will not work:
1
2
3
4
5
6
7
8
9
10
11
12
13
on("clicked:reset", function() {
    getAttrs(["hp_max"], (values) => {
      const hpMax = values.hp_max;
    }); // Close getAttrs

    // getAttrs is an async method, so this will run WITHOUT waiting for getAttrs.
    // It won't even know what "hpMax" refers to, and will throw an error!
    setAttrs({
        "hp" : hpMax
    });

}); // Close on
No!
If you want to use the values from getAttrs, you must use them from within the callback. This includes calling setAttrs.
That same example done right:
1
2
3
4
5
6
7
8
9
10
on("clicked:reset", function() {
    getAttrs(["hp_max"], (values) => {
        const hpMax = parseInt(values.hp_max); // ALWAYS call parseInt() on numbers!

        setAttrs({
            "hp" : hpMax
        });

    }); // Close getAttrs
}); // Close on
This is also fine, since it doesn’t use getAttrs at all:
1
2
3
4
5
6
7
8
9
10
11
on("change:constitution", function(eventInfo) {
    const con = parseInt(eventInfo.newValue);

    // Assume max hit points are determined solely by constitution
    const hpMax = con * 5;

    setAttrs({
        "hp_max" : hpMax
    });

}); // Close on
Takeaways:
- Always call
parseInt()on a number - Always call
setAttrs()from the callback of agetAttrs()(if you’re usinggetAttrs())
Repeating Sessions
Repeating sections are difficult, and I recommend you read the Roll20 Wiki page on them. They go into more detail than I will here.
Basically, there’s two takeaways:
From inside a session
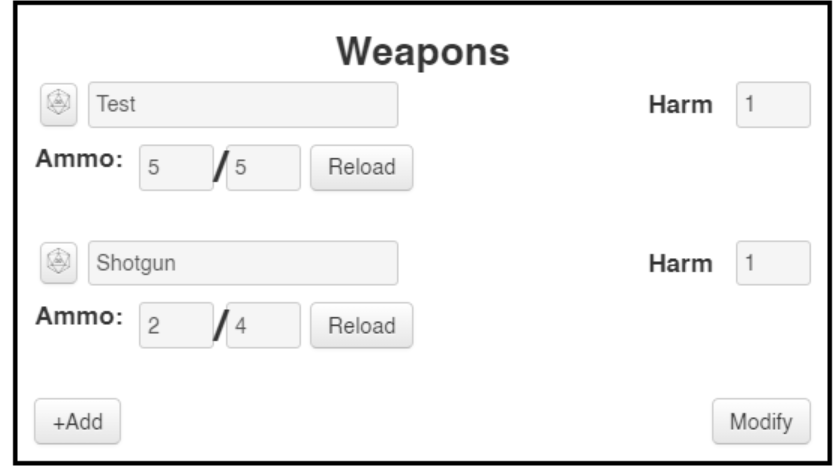
If you’re inside a repeating section (like clicking our reload button that every repeating weapon has), you can can use getSttrs and setAttrs as normal, except that you have to prefix things with the repeating section’s name.
For example
1
2
3
4
5
6
7
8
9
on("clicked:repeating_weapon:reload", function(eventInfo) {
    getAttrs(["repeating_weapon_max_ammo"], function(values) {
        maxAmmo = parseInt(values.repeating_weapon_max_ammo);

        setAttrs({
            repeating_weapon_ammo: maxAmmo
        });
    }); // close getAttrs
});
Notice that our event is clicked:repeating_weapon:reload. “repeating_weapon” is our repeating section name, “reload” is the button name.
Because we’re talking about the same ammo and the same ammo as the button that was clicked, we can simply call it with repeating_weapon_ammo.
From elsewhere (or a different one)
If we’re OUTSIDE a repeating section (or if we want to refer to a different one), we have to use its special name (remember the data-reprowid attribute from session 6?)
1
2
3
getAttrs(["repeating_weapon_-ABC123_ammo"], function(values){
    // TODO
});
The best way to do this is to use another built in function called getSectionIDs, that will provide an array of each of the repRowIds that have been assigned for a given repeating section.
Here’s some code that Cyberrats uses to “unuse” each of the drones (drones in Cyberrats can only be used once per mission. I provide a “reset” button that unchecks their “used” checkmark, as well as restoring operatives to full health).
1
2
3
4
5
6
7
8
9
getSectionIDs("repeating_drone",  function(idarray) {
    let rows = {};
    for (let i = 0; i < idarray.length; i++) {
        rows['repeating_drone_' + idarray[i] + '_used'] = 0;
    }
    if(rows) {
        setAttrs(rows);
    }
});
I recommend copying this code and modifying it as you need, taking extra care to note the extra underscores (_) on line 4.
This code uses a lot of shorthand, and I don’t recommend spending time trying to understand it. If you really want to, let’s break it down:
Line 1 calls getSectionIds with the name of our section. Then it starts the callback. The variable we use is idarray, which contains an array of the ids. Good stuff.
Line 2 we declare an empty object. This will eventually be passed in to setAttrs as a parameter on line 7.
Line 3 is our for loop. I’ll rewrite this loop using while below. It iterates over every element of our idarray and builds a string in the form of “repeating_drone_<id>_used”. Then we make a new property on our rows object with that new string and set its value to 0. This is (roughly) equivalent to unchecked.
Note: Roll20 doesn’t let us directly set the value of a checkbox to checked or unchecked. Instead, we can set the
valueattribute in HTML, and use a scriptworker to set the checkbox to that value to indicate “checked” and 0 to mean unchecked. This has other implications, discussed below.
Line 6 is just a safety check so that we never send in an empty object. As long as thee’s one or more properties set, it’ll return true, and in line 7 we pass our object.
Usually for setAttrs(), we would build our object directly inline, but this method works as well.
Bonus: the for loop, rewritten
I promised last session I would provide this for folks who are intimidated by the for loop’s syntax. I was for a while when I first learned to code.
1
2
3
4
5
6
7
8
9
10
11
12
13
getSectionIDs("repeating_drone",  function(idarray) {
    let rows = {};
    let i = 0;

    while(i < idarray.length){
        rows['repeating_drone_' + idarray[i] + '_used'] = 0;
        i++;
    }

    if(rows) {
        setAttrs(rows);
    }
});
That wasn’t so bad!
Action Buttons
Roll20 has two types of buttons, action buttons and roll buttons. Roll buttons send a roll to chat (using a template you can define, see next session).
Action buttons are an entrypoint to JavaScript, and, as of 2021, they also let you start a roll! In this way, action buttons are more powerful than roll buttons.
You can use these to modify results of a roll, change attributes, and much, much more. They just need to have type="action" and name="act_whatever".
Read more about them on the Roll20 wiki.
What can’t you do
Can’t use JQuery Yet
JQuery is one of the most popular JavaScript libraries of all time, and a limited version of it is coming soon to Roll20. Right now, it’s only available in the development server (something that I didn’t realize for a long time. I lost many hours trying to figure out why the examples in the wiki weren’t working for me).
The dev server is a special part of Roll20 that shows off features that are coming soon. Features there are in testing, and cannot be used for general sheets.
Jquery is coming soon, and then you’ll be able to dynamically add or remove classes from elements in an event listener. This is useful for styling!
Can’t set the “checked” value of a checkbox
We talked in [session 7]((/tutorials/roll20-character-sheet/7) about matching a checkbox with the :checked CSS selector. Unfortunately, there’s no way to dynamically check or uncheck a checkbox in Roll20.
More precisely, there’s no way to change the checked property. What you CAN do is give the checkbox a value when you define it:
1
<input class="custom" type="checkbox" name="attr_mybox" value="1"/>
And then use your listener to set the value of that checkbox (with setAttrs) to either 1 (checked) or 0 (unchecked). However, your :checked CSS selector will not work! instead, use .custom[value="1"] or .custom[value="0"].
If the checkbox will only be toggled by players (and not by JavaScript), you can continue to use :checked as normal.
But you CAN set its value, which can be the same thing
(or close enough — check [value=1] instead of :checked)
Demo
Add the following code to your .html file:
1
2
3
4
5
6
7
8
9
10
11
12
<!-- scripts -->
<script type="text/worker">
    on("clicked:repeating_weapon:reload", function(eventInfo) {
        getAttrs(["repeating_weapon_max_ammo"], function(values) {
            maxAmmo = parseInt(values.repeating_weapon_max_ammo);

            setAttrs({
                repeating_weapon_ammo: maxAmmo
            });
        });
    });
</script>
I recommend typing all of this out. It’s good practice and will help you feel more confident, as well as help some of these practices sink in.
Then make some weapons and try that reload button out!
Summary
Whew! Now you know enough JavaScript to be dangerous. Or at least to make some wicked character sheets! You can respond to user clicks, update attributes, and log to the console if something seems wonky.
Take a moment to be proud of yourself. This is hard stuff. I’m proud of you.
Then, when you’re ready, let’s move on to the next session. In that one, we’ll learn about roll templates, so we can make our roll buttons send nicely formatted information to the chat.
We’re almost done! After that we’ll learn a handful more advanced tips (like dark mode!), and then it’s onto our final session where we’ll submit our character sheet to Roll20 for all to use.