Our header is done! Let’s jump into the body. We’re going to learn about repeating sections, the img tag (and re-using our avatar), and set ourselves up for some button work that we’ll return to in later sessions.
The Body
We’re going to get a two-for-one here, as we fill out Powers and Weapons together. They’ll both use the same techniques, but weapons will have a reload button, which we can take advantage of in our JavaScript session.
Repeating Sections
We don’t know how many powers or weapons our players will have. We could make an assumption, but any time software makes assumptions about how it will be used, those assumptions create limitations on the people using them. Limitations lead to frustration, so let’s aim for flexibility.
Here, flexibility means letting the user add as many powers as they want. Luckily, Roll20 provides an excellent tool for this called fieldset. The way fieldset works is that we define what one power looks like, and Roll20 gives players a convenient “add” button to duplicate as many as they want. Neato!
So what is a power? Well, it has a name, a description, and a biotech cost. And we should probably include some way for the player to send all of that info to the chat (more on this when we get to Roll Templates ).
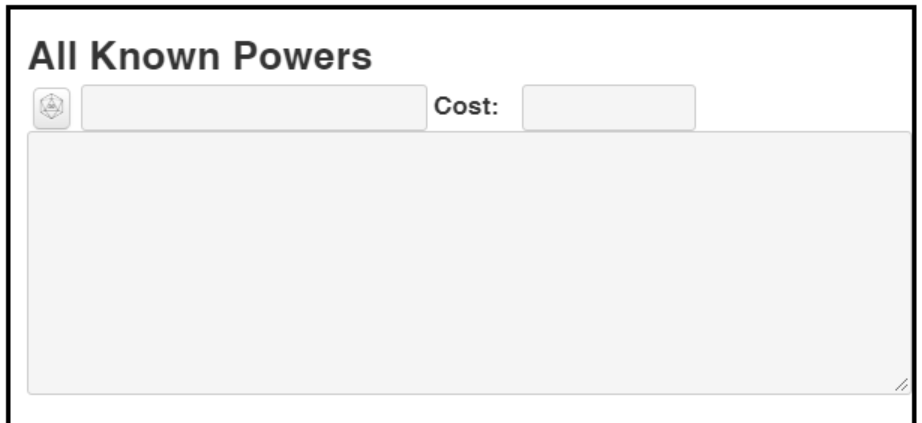
So let’s toss that all together. For now, we can put this direction under our “All Known Powers” h2.
1
2
3
4
5
<button type="roll" name="roll_power"></button>
<input type="text" name="attr_name"/>
<label for="power-cost" class="inline">Cost:</label>
<input type="text" id="power-cost" class="cost" name="attr_cost"/>
<textarea name="attr_description">
Note the inline class on our label so it doesn’t use Roll20’s block default. Let’s also add some CSS to shrink our cost input, since it shouldn’t need to be so long.
1
2
3
.cost {
  width: 20%;
}
Note: I previously said that all inputs should have a label, yet here I eschew one for the name. Sometimes it’s obvious what an input is for. Other times you can set default text (“Power Name”), but Roll20 can get annoying when players delete this text, sometimes appending it to their new input instead.
 For a first attempt, it’t not bad.
That looks mostly right. Let’s make “cost” right aligned. First we should wrap the input and label both in a span. Then we can use our Element Inspector (right click -> Inspect) to add some properties to that span, just to see what happens.
Tip: The best part of using the Element Inspector like this is that nothing is permanent. If you make a mistake, simply refresh the page (or reload the HTML or CSS) and viola, it’s back to your saved state.
First I set float: right on the span, and that looked okay, except the cost input was way too big. Let’s shrink that down to 3em. That’s the width of three “M” characters, which should be plenty: even the most expensive powers in Cyberrats don’t hit double digits.
Cost looks a little small, but we can return to this later. For the actual Cyberrats character sheet, I also added an “equipped?” checkbox. We could do that, or we could decide to shrink this entire section.
While we’re here, let’s also center “All Known Powers.”
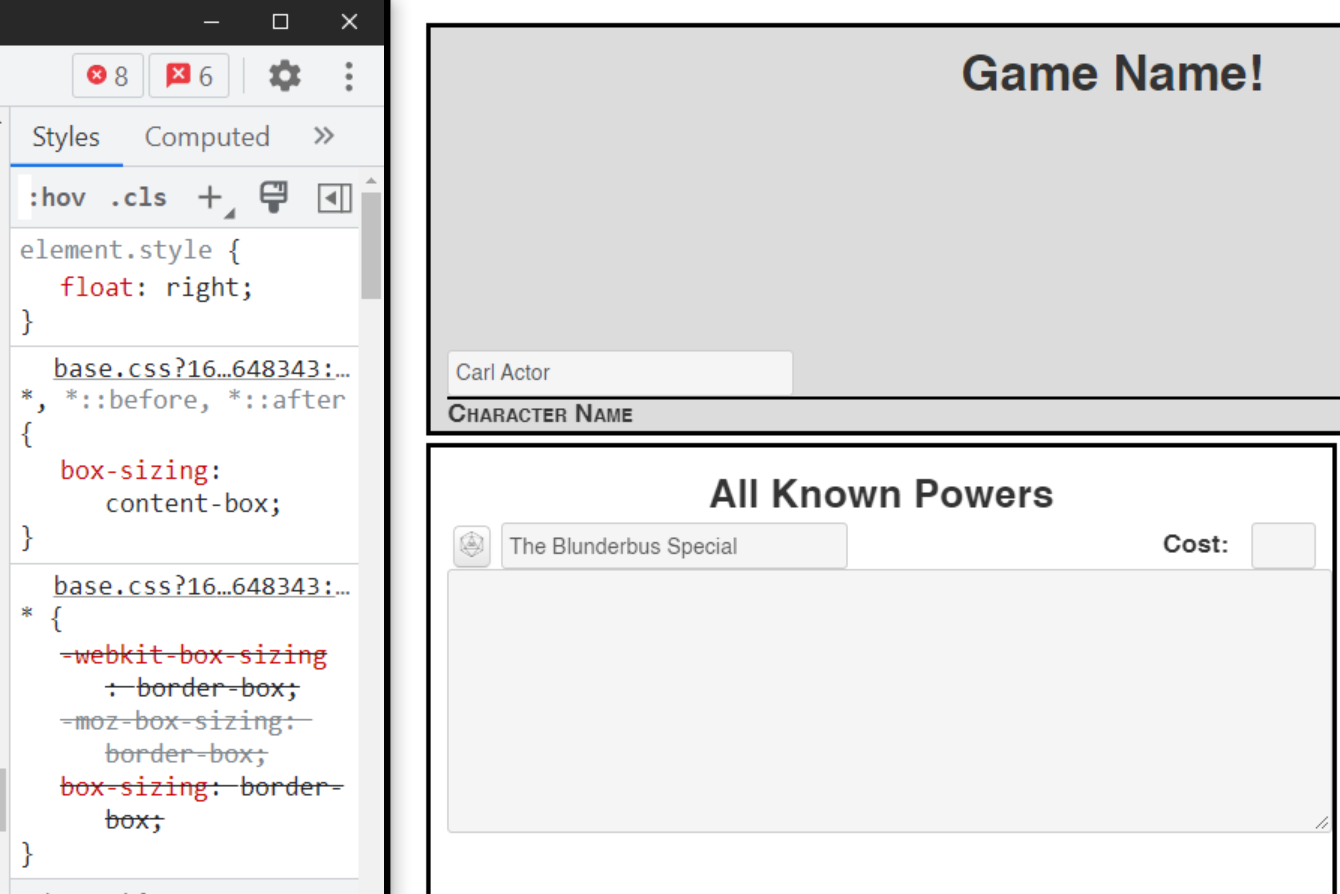 In “element.style” I added my experimental properties.
1
2
3
4
<span class="pull-right">
    <label for="power-cost" class="inline">Cost:</label>
    <input type="text" id="power-cost" class="cost" name="attr_cost"/>
</span>
1
2
3
4
5
6
7
8
9
10
11
h1, h2 { /* Added ", h2". If we have other h2s in the future, we could change to class="centered" instead */
    text-align:center;
}

.cost {
  width: 3em;
}

.pull-right {
  float: right;
}
I thought about putting the cost in as a number, but some powers have variable cost (X), so making it a number would limit the players, creating a potentially bad experience. So a text input it remains. This does mean I can’t guarantee it’s a number, so I can’t have a button that (reliably) subtracts the cost of the power from the character’s available Biotech.
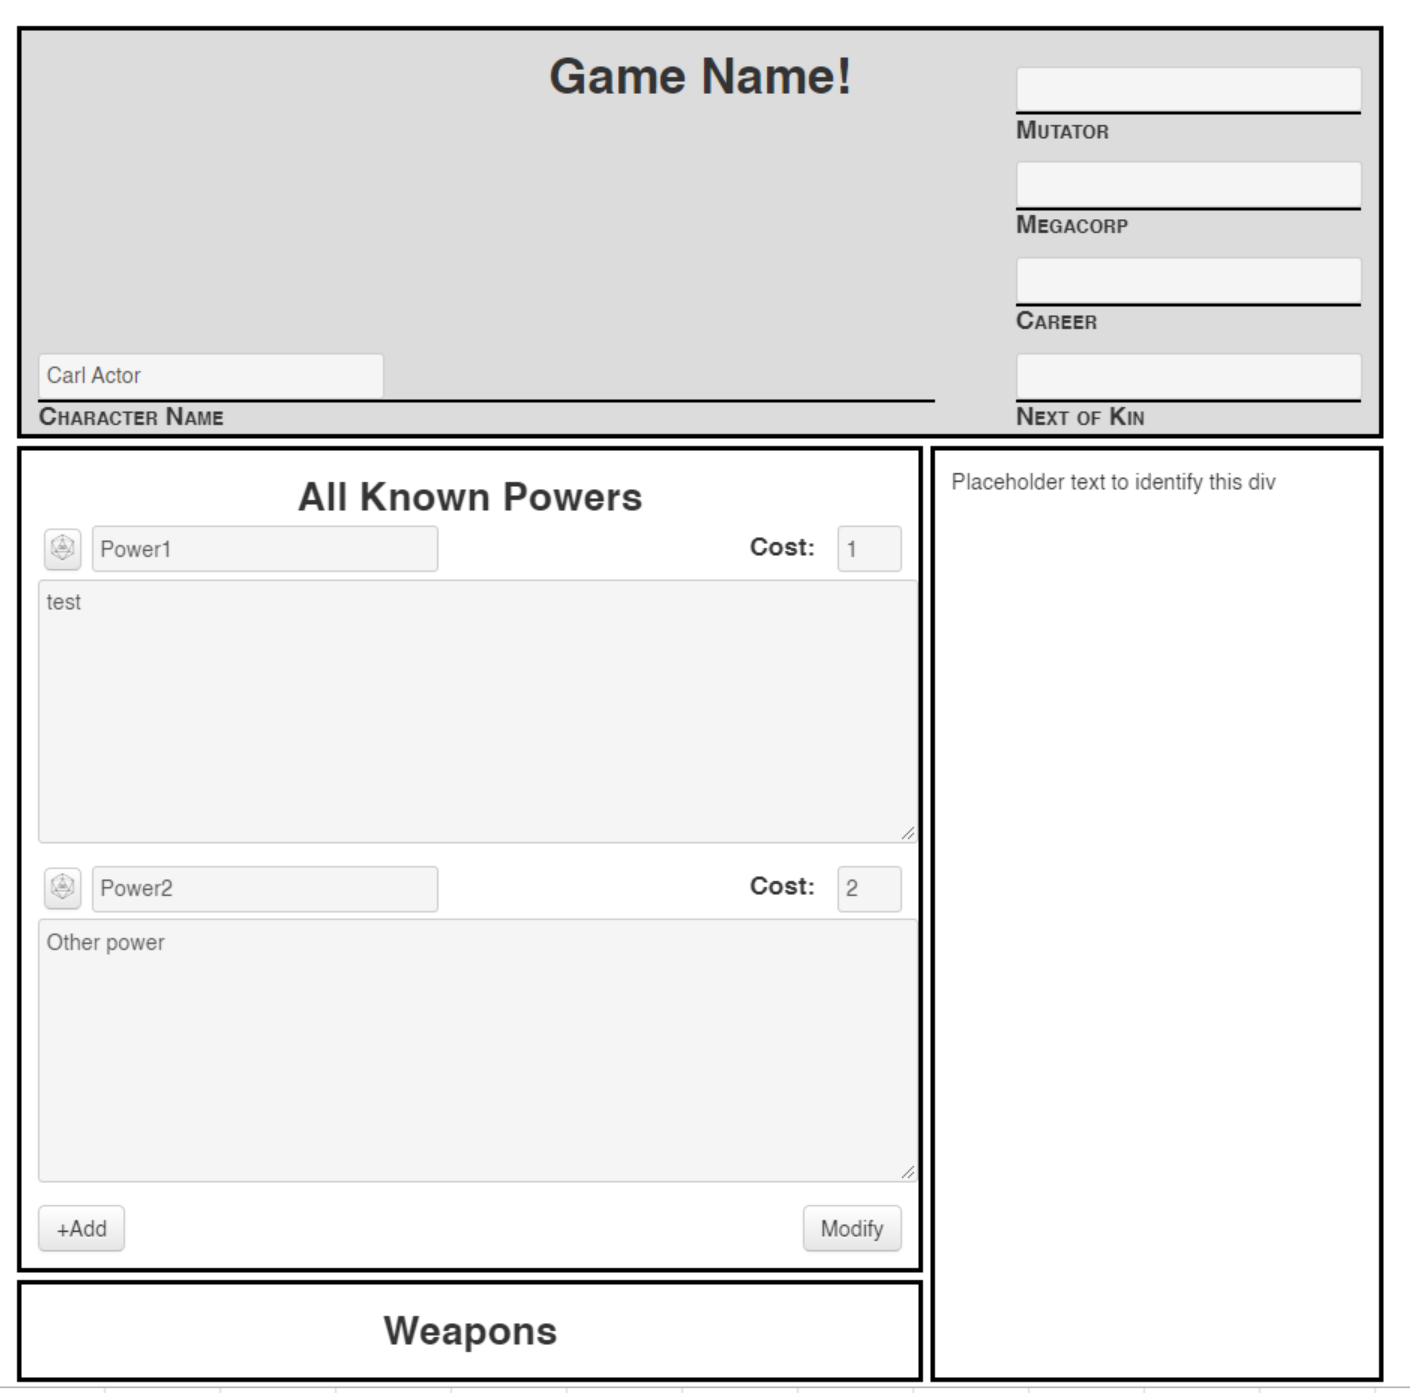
But what about repeating?
That’s great, we have a single power! But I thought we were going to get it to repeat?
Yup! All we’ve got to do is surround our one power with <fieldset> tags, and to give those tags a class that starts with “repeating_”. Let’s go with “repeating_powers”.
1
2
3
4
5
6
7
8
9
<fieldset class="repeating_powers">
    <button type="roll" name="roll_power"></button>
    <input type="text" name="attr_name"/>
    <span class="pull-right">
    <label for="power-cost" class="inline">Cost:</label>
    <input type="text" id="power-cost" class="cost" name="attr_cost"/>
    </span>
    <textarea name="attr_description">
</fieldset>
 Would you look at that?
It’s that easy! I know our Roll button doesn’t do anything yet, but we’ll return to that in a future session. For now, let’s clean up the CSS a little, and then move on to weapons.
Wait, I thought attr_names and ids had to be unique?
Okay, you got me. I said id should be globally unique, and that’s mostly true. Unfortunately, there’s no good way to avoid it in a repeating section. You could choose to omit the input’s id (and the label’s for), but really you’re stuck with no good options. Since we can’t target with JQuery on id (yet) and since we aren’t using CSS for id, I chose to duplicate it.
As for the attr_name, that’s an excellent point! How does ROll20 know the difference between the first power’s name and the second?
The answer lies in the Element Inspector (seriously, use this!). Roll20 generates an attribute called data-reprowid, a unique value you can use to refer to a specific element in a repeating section. When we get to JavaScript, you’ll see that you can’t simply refer to a power, but need to either iterate through the reprowids, or to respond to an event (like a button click) from the same repeating element you’re referencing.
 See the data-reprowid?
Attribute names (like our name) need to be unique only within a repeating section. That’s why I chose to call our inputs “name’ and “cost” instead of “power-name” and “power-cost”. When we actually refer to them, it will be as “repeating_power_name”, so there’s no confusion!
Cleaning up the CSS
Before we move on to weapons, let’s clean up our textarea by adding a margin-top: 4px; to give it some breathing room.
You may have noticed that you can resize the textarea both horizontally and vertically. If you expand it horizontally, it resizes the whole column. This is because we have our section set to 1fr instead of an actual size. We can stop the user from resizing horizontally by setting resize: vertical. Let’s wrap both of these settings in a vert-only class.
1
2
<!-- ... -->
<textarea class="vet-only" name="attr_description">
1
2
3
4
.vert-only {
  margin-top: 4px;
  resize-vertical;
}
The Danger of FR
You may remember that we define our grid area in units of fr, or fractions of a page. Using fr is a double-edged sword. On one hand, it allows for a lot of flexibility: if your section only spans one row, no matter how many elements you add to a repeating-section, the section will continue to grow indefinitely! But on the other hand, if your section spans more than one row, it won’t expand at all, even if both rows are measured in fr. This can lead to content spilling out beyond into another section!
If you give a fixed size for your sections (like our header), then you can use a property like max-width: 90% on a textbox to allow it to be expanded horizontally up to 90% of the width of the container. But fr isn’t valid in that context.
Weapons
We have two options here: we can either have Powers and Weapons share a section, or we can make a new one. It doesn’t matter too much, but for practice, let’s revisit our grid and add a new row.
1
2
3
4
5
6
7
8
9
10
11
.character-sheet {
/* ... */
grid-template-rows: 250px 1fr 1fr;
grid-template-areas: "header header"
                    "powers information"
                    "weapons information";
}

.weapons {
    grid-area: weapons;
}
and we need to make a corresponding section in our HTML:
1
2
3
<div class="section weapons">
<h2>Weapons</h2>
</div>
That gives us this:
Weapons will look very similar to powers. They’ll have a name, an ammo (and a max ammo), a harm, and two buttons: one to put the name and Harm into chat, and one to reload. We won’t implement either yet.
Tip: If you have attributes that can be depleted, the Roll20 convention is to name them <name> and <name_max>. For example, we’ll call our ammo “ammo” and our max ammo “ammo_max”. This lets players use the bars above their tokens for these attributes.
1
2
3
4
5
6
7
8
9
10
11
12
13
14
15
16
17
<fieldset class="repeating_weapons">
<div class="weapon">
    <button type="roll" name="roll_weapon"></button>
    <input class="weapon" spellcheck="false" type="text" name="attr_weaponname" value="Name">
    <span class="pull-right">
        <label class="harmlabel">Harm</label>
        <input class="harmcounter" type="number" name="attr_harm" value="1">
    </span>
    <span class="ammo">
    <label>Ammo:</label>
    <input type="number" value="1" name="attr_ammo"></input>
    <p class="slash">/</p>
    <input type="number"value="1" name="attr_max_ammo"></input>
    <button type="action"  name="act_reload">Reload</button>
    </span>
</div>
</fieldset>
The actual Cyberrats sheet is more complex, and includes checkboxes for range, but this is just a template.
Woah, that’s a lot of information! Let’s take it one by one.
First we’ve got our roll button. Like before, this doesn’t do anything yet.
Then our input. Setting spellcheck="false;" is a great habit for things with unusual spellings (like a lot of things in RPGs). Let’s set it on our other text inputs and textareas as well.
THen our label and our harm input. We set the default value to 1 so it isn’t blank. And we add a “harmcounter” class for styling in a bit. Toss this all in a span and add “pull-right”, the custom class we just created.
Then a span (with a class for future styling) for our ammo. We want it to say 2 / 5, for example. The “slash” class will be reused whenever we want to display a max. We’ll update it to be large and positioned correctly.
Then we’ve got an action button that will eventually reload (setting ammo equal to ammo_max). This won’t happen until the JavaScript section.
Now, let’s add some CSS.
1
2
3
4
5
6
7
8
9
10
11
12
13
14
15
16
17
18
19
20
21
22
23
24
25
26
27
28
29
30
input.harmcounter {
  width: 3em;
}

label.harmlabel {
  position: relative;
  bottom: -2px;
  margin-left: 1px;
  margin-right: 0px;
  display: inline;
}

input.weapon {
  width: 40%;
}

span.ammo {
  display: flex;
}

span.ammo > label {
  width: fit-content;
}

span.ammo > p.slash {
  font-size: 2em;
  font-weight: bold;
  position: relative;
  top: 6px;
}
Woah! What’s all this > business? This is the child selector. It’s a stricter version of the descendant selector we learned about in session 5. span.ammo > p.slash matches only p elements that have a class of “slash” AND that have a parent of a span with a class of “ammo”.
So where does all that CSS leave us?
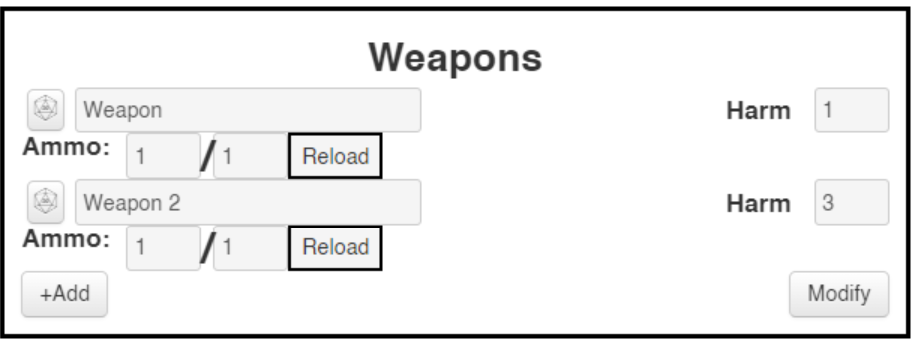
You may notice that if you hit “add” and don’t add a weapon before refreshing the HTML that Roll20 will remove your empty weapon. It tries to keep things clean. To prevent this while testing, just change any value, or give it a dummy name.
Hmm. That looks pretty cramped.
First, let’s add the “btn” style to our Reload button. “btn” is a built-in class that Roll20 provides that will make it look more like the Add and Modify buttons below.
Then, we notice that our harmcounter class does the same thing as our cost class, so let’s remove harmcounter from our CSS and HTML and change the input’s class to cost.
Cyberrats uses static Harm, meaning no one ever rolls for damage. This gives us the luxury of using an
inputwith type of number. It’s only slightly harder to have two inputs, one for dice size (d4, d6, etc.) and one for number to roll. Or to add a third input for modifier, giving you [3] [d8] + [4].
Then we can add some spacing after each weapon and after the ammo with margin-bottom. We can use our new child selector to match the first input .weapon > input { margin-bottom: 10px; } and then simply add a margin-bottom: 30px to our ammo span.
Or we could just add a margin-top to our ammo span as well, and leave the .weapon > input selector off entirely. This second approach is a little more readable, so let’s stick with it.
Add a .reload class to the reload button and give it a margin-left of 5px for some buffer, and that’s good enough for now.
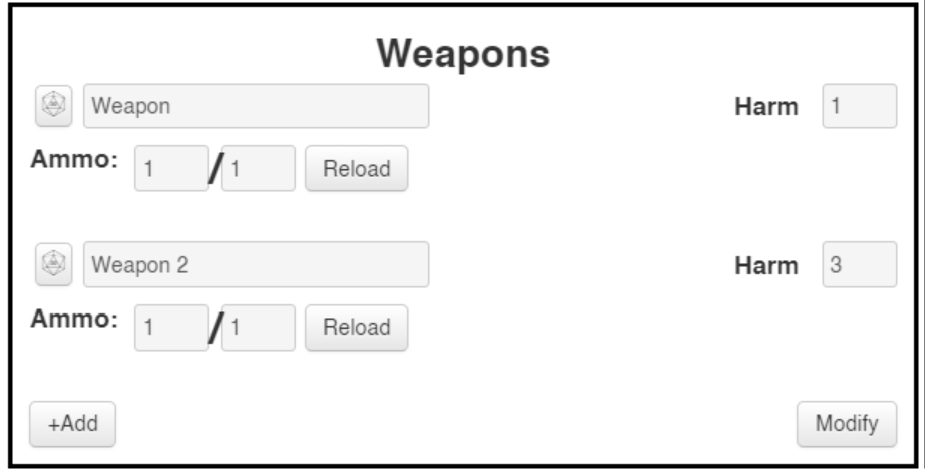
I still think this whole section is a little too wide for how we’re using it, but that’s an easy thing to fix. I’ll change our first column from 2fr to 1.5fr, and that helps a lot.
There’s just one more change I want to make in the body of the sheet, and then I’ll close up this session.
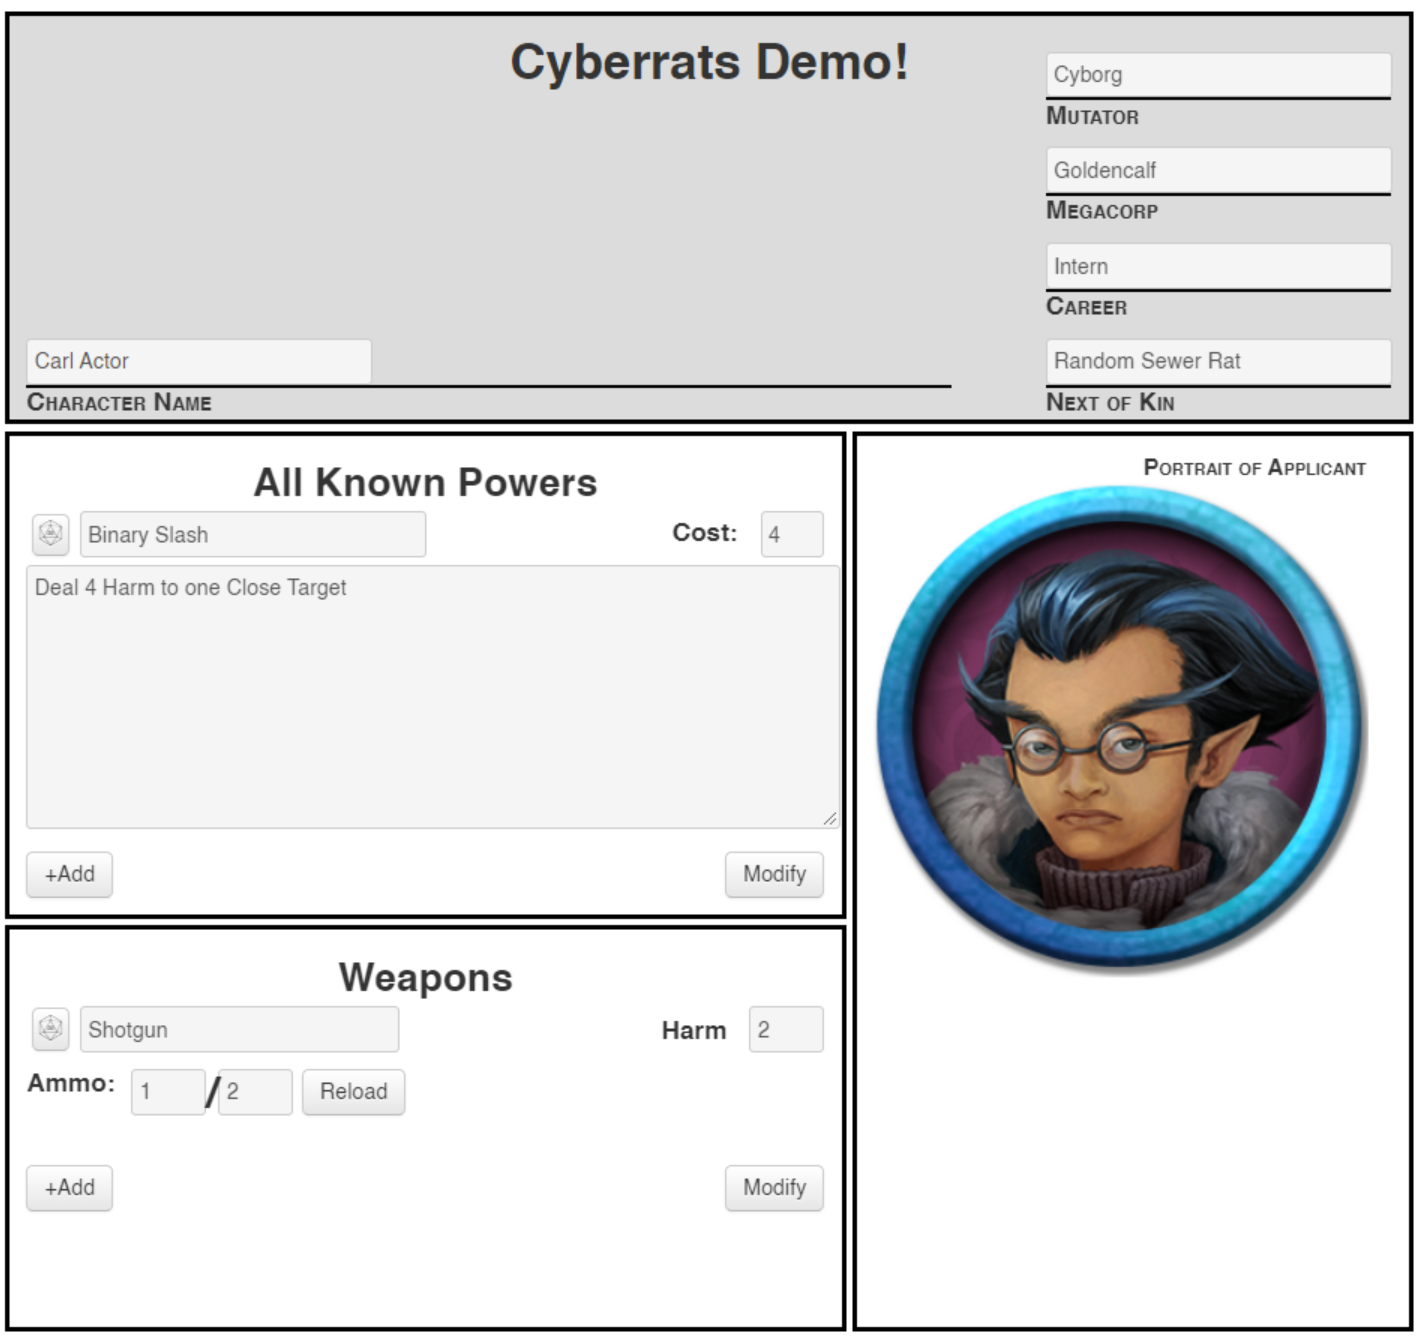
One Last Thing: Portrait
Our sidebar has been empty for too long. I’m not going to fill it out entirely, but I will put in the portrait. It’s basically just an image (img) tag with some CSS.
First the HTML:
1
2
3
4
5
<div class="section information">
    <!-- Remove the placeholder text, finally. -->
    <h4 class="caption">Portrait of Applicant</h4>
    <img class="portrait" name="attr_character_avatar">
</div>
Note that by using “attr_character_avatar”, we’re tying to the avatar that players can pick for their characters. If a player sets one, it will update here!
and the CSS:
1
2
3
4
5
6
7
8
9
10
h4.caption {
    font-variant: small-caps;
    text-align: right;
    width: 95%;
}

img.portrait {
    height: 300px; /* Hard coded to a value that looks nice. */
    width: 300px;
}
If the character doesn’t have an avatar, it matches the character sheet:
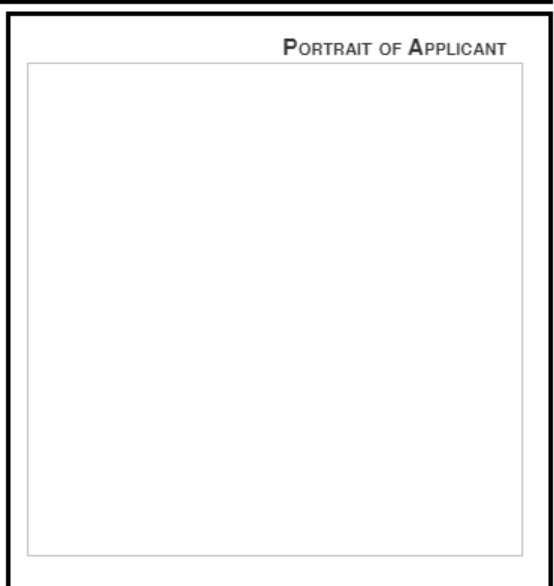
…But if they do, it shows up.

Summary
In this session, we learned about repeating sections, the CSS child selector, images and portraits, and set the stage to learn about JavaScript and Roll Templates in the future.
We’re not going to fill out the rest of the information panel in this tutorial. If you’d like to, you can (or deviate and build your own sheet instead!)
You should have all the knowledge you need by now to build the structure of your sheet and apply basic stylings.
Need to add an extra column or row? Go wild! You’ve got this.
Next time we’ll focus on “advanced” CSS techniques that will let you do things like:
- Let users toggle an expansion or supplement on or off, and change the character sheet accordingly
- Affect only the first element in a repeating section
- Adding content before or after another element
- Counting your repeating elements
- Using variables so you don’t have to repeat colors you use a lot
And more!
The end is in sight! We have just a few more topics remaining, including JavaScript listeners, Roll Templates, Action buttons vs Roll buttons, and dark mode!
Code So Far
1
2
3
4
5
6
7
8
9
10
11
12
13
14
15
16
17
18
19
20
21
22
23
24
25
26
27
28
29
30
31
32
33
34
35
36
37
38
39
40
41
42
43
44
45
46
47
48
49
50
51
52
53
54
55
56
57
58
59
60
61
62
63
64
65
66
67
68
69
70
71
72
73
74
75
76
77
78
79
80
81
82
83
84
85
86
87
88
<div class="character-sheet">
  <div class="section header">
    <h1>Cyberrats Demo!</h1>
    <div class="header-content">

    <div class="left">
      <span class="character-stat">
      <label class="inline" for="character-name">Character Name</label>
      <input type="text" spellcheck="false" id="character-name" name="attr_character_name"/>
      </span>
    </div>

    <div class="right">
      <div class="character-stat">
        <label class="inline" for="character-mutator"> Mutator </label>
        <input type="text" spellcheck="false" id="character-mutator" name="attr_mutator"/>
      </div>
      <div class="character-stat">
        <label class="inline" for="corp"> Megacorp </label>
        <input type="text" spellcheck="false" list="megacorps" id="corp" name="attr_corp"/>
      </div>
      <div class="character-stat">
        <label class="inline" for="character-career"> Career </label>
        <input type="text" spellcheck="false" id="character-career" name="attr_career"/>
      </div>
      <div class="character-stat">
        <label class="inline" for="next-of-kin"> Next of Kin </label>
        <input type="text" spellcheck="false" id="next-of-kin" name="attr_next-of-kin"/>
      </div>
    </div> <!-- End of Right -->

    </div>
  </div>
  <!-- End of Header div -->

  <div class="section powers">
    <h2>All Known Powers</h2>

    <fieldset class="repeating_powers">
      <button type="roll" name="roll_power"></button>
      <input type="text" spellcheck="false" name="attr_name"/>
      <span class="pull-right">
        <label for="power-cost" class="inline">Cost:</label>
        <input type="text" id="power-cost" class="cost" name="attr_cost"/>
      </span>
      <textarea spellcheck="false" class="vert-only" name="attr_description">
    </fieldset>

  </div>

  <div class="section weapons">
    <h2>Weapons</h2>
    <fieldset class="repeating_weapon">

      <div class="weapon">
        <button type="roll" name="roll_weapon"></button>
        <input class="weapon" spellcheck="false" type="text" name="attr_name" value="Name">
        <span class="pull-right">
          <label class="harmlabel">Harm</label>
          <input class="cost" type="number" name="attr_harm" value="1">
        </span>

        <span class="ammo">
          <label>Ammo:</label>
          <input type="number" value="1" name="attr_ammo"></input>
          <p class="slash">/</p>
          <input type="number" value="1" name="attr_max_ammo"></input>
          <button type="action" class="btn reload" name="act_reload">Reload</button>
        </span>

      </div>

    </fieldset>
  </div>

  <!-- This is the right-hand sidebar -->
  <div class="section information">
    <h4 class="caption">Portrait of Applicant</h4>
    <img class="portrait" name="attr_character_avatar">
  </div>
</div>

<!-- Datalists -->
<datalist id="megacorps">
  <option>Goldencalf</option>
  <option>Gargoyle</option>
  <option>Dorsey</option>
</datalist>
1
2
3
4
5
6
7
8
9
10
11
12
13
14
15
16
17
18
19
20
21
22
23
24
25
26
27
28
29
30
31
32
33
34
35
36
37
38
39
40
41
42
43
44
45
46
47
48
49
50
51
52
53
54
55
56
57
58
59
60
61
62
63
64
65
66
67
68
69
70
71
72
73
74
75
76
77
78
79
80
81
82
83
84
85
86
87
88
89
90
91
92
93
94
95
96
97
98
99
100
101
102
103
104
105
106
107
108
109
110
111
112
113
114
115
116
117
118
119
120
121
122
h1, h2 {
    text-align:center;
}

label.inline {
    display:inline;
}

.header {
    background-color: #dcdcdc; /* A nice light gray */
    grid-area: header;
}

.information {
    grid-area: information;
}

.powers {
    grid-area: powers;
}

/* This applies to every section */
.section {
    border: 3px solid black;
    padding: 10px;
}

.character-sheet {
  display: grid;
  grid-template-columns: 1.5fr 1fr;
  grid-template-rows: 250px 1fr 1fr;
  grid-template-areas: "header header"
                       "powers information"
                       "weapons information";
  grid-gap: 4px;
  height: 800px;
}

.character-stat {
    display: flex;
    flex-direction: column-reverse;
}

.left, .right {
  display: flex;
  flex-direction: column;
}

.left {
  justify-content: end;
  width: 70%;
}

.header-content {
  display: flex;
  flex-direction: row;
  justify-content: space-between;
  margin-top: -25px;
}

.character-stat label.inline {
    border-top: 2px solid black;
    width: 95%;
    font-variant: small-caps;
}

.cost {
  width: 3em;
}

.pull-right {
  float: right;
}

.vert-only {
  margin-top: 4px;
  resize: vertical;
}

label.harmlabel {
  position: relative;
  bottom: -2px;
  margin-left: 1px;
  margin-right: 0px;
  display: inline;
}

input.weapon {
  width: 40%;
}

span.ammo {
	display: flex;
  margin-bottom: 30px;
  margin-top: 10px;
}

span.ammo > label {
  width: fit-content;
}

span.ammo > p.slash {
  font-size: 2em;
  font-weight: bold;
  position: relative;
  top: 6px;
}

.reload {
  margin-left: 5px;
}

h4.caption {
    font-variant: small-caps;
    text-align: right;
    width: 95%;
}

img.portrait {
    height: 300px; /* Hard coded to a value that looks nice. */
    width: 300px;
}