
What Are Roll Templates
Roll templates are styled pieces of HTML that display certain data in the Roll20 chat window. They are tiny, reusable pieces of HTML that define a layout for different parameters that can be passed in. You can see some of the roll templates that Cyberrats uses below.
You can think of roll templates as miniature character sheets. Luckily, they’re a lot easier to make!
As always, the Roll20 Wiki is an excellent resource, and one you should use.
Logistics
A roll template has three parts: first, the definition of the template. This will be done in HTML, and will live in your characterSheet.html file.
Second, the definition of the CSS. Just like your character sheet, you can style your roll template to move things around (we’ll revisit our old friend CSS Grid in this session), change element sizes, set background images, and alter colors. The CSS will live in your characterSheet.css file, though character sheets have to be handled a little differently than the rest of your sheet, as you’ll see shortly.
Third is the invocation. Once we define a roll template, we have to call it. This is done using a roll button and passing in certain parameters. Naturally, this will all be passed in as a value to a roll button, and will live in your HTML file as well.
Let’s jump into a tutorial!
HTML
We’re going to need to add our roll templates to our HTML file. I recommend adding a new “section” towards the bottom of the sheet, just above our scripts. If you’ve been following along with the tutorial, add them right below your datalist section.
A roll template uses a custom HTML element aptly named “rolltemplate”. As an attribute, it takes in a class. Unlike our other classes, this class MUST begin with “sheet-“
Until 2021, all custom classes had to start with “sheet-“. Now, only roll templates must. If you omit “sheet-“, your roll template will not work.
Let’s make a template for our powers first. I like clarity, so let’s call the class “sheet-rolltemplate-powers”.
1
2
3
4
<!-- roll templates -->
<rolltemplate class="sheet-rolltemplate-powers">
    <!-- todo -->
</rolltemplate>
Templates are reusable in two ways. The first way is that they can take in parameters, just like a JavaScript function. Whenever you use a template, you pass in different properties and can display them in the template.
So we can define a template with a div that contains the name of a power. Then whenever we call the template, we simply pass in the power’s name, and it will display it the same way.
The second way they are reusable is that we can have sections conditionally show up depending on whether or not a power was passed in.
The below code uses both techniques:
1
2
3
4
5
6
7
{% raw %}<rolltemplate class="sheet-rolltemplate-powers">
    {{#powerName}}
        <div class="sheet-powerName">
            {{powerName}}
        </div>
    {{/powerName}}
</rolltemplate>
Line 2 defines a conditional section: everything between this line and its closing brace (on line 6) will ONLY be rendered if the template is called with an attribute named “powerName”.
We’ll talk about how to pass in parameters shortly.
Line 3 should look familiar to you: it’s simply a div with a class. We use the “sheet-“ prefix on the class name because we are in a roll template.
Line 4 is the interesting one: wrapping the name of a property in double curly brackets ({{}}) will output the value of that property. So if this template is called with powerName=”Binary Slash”, then “Binary Slash” will be printed inside this div.
We can use CSS to style it, just like any other div.
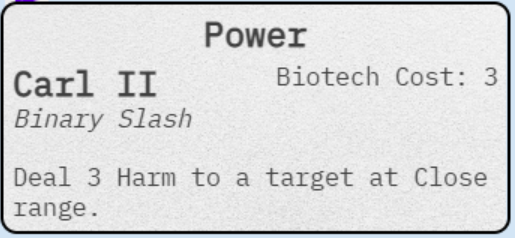
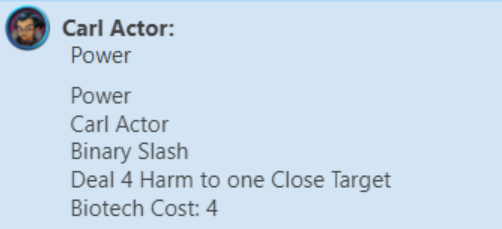
Looking at our repeating powers, we can see that we have a name, a cost, and a description. Let’s fill out the rest of the template with those attributes.
1
2
3
4
5
6
7
8
9
10
11
12
13
14
15
16
17
18
19
20
21
22
23
24
25
26
27
28
29
30
31
32
33
<rolltemplate class="sheet-rolltemplate-powers">

      {{#title}}
        <div class="sheet-title">
        {{title}}
        </div>
      {{/title}}

      {{#name}}
        <div class="sheet-name">
          {{name}}
        </div>
      {{/name}}

      {{#powerName}}
        <div class="sheet-powerName">
          {{powerName}}
        </div>
      {{/powerName}}

      {{#description}}
        <div class="sheet-description">
          {{description}}
        </div>
      {{/description}}

      {{#cost}}
        <div class="sheet-cost">
          Biotech Cost: {{cost}}
        </div>
      {{/cost}}

</rolltemplate>
This is basically the same as what we’ve seen so far: each section is surrounded by a conditional, a div with a unique class name, and the property itself.
Invoking the Template
Before we style it, let’s get this thing working! In our HTML, find our “roll_power” button. For me, it’s on line 40 of the HTML.
Roll buttons are tied to templates through their value attribute. To attack a template, we pass a value of “&template:<templateName>}” In our case, it should look like this:
1
<button type="roll" name="roll_power" value="&{template:powers}"></button>
This doesn’t do anything yet (which makes sense! We don’t have any properties, so none of our HTML is rendering!). Let’s throw in a title.
The way to add a property in a template is to wrap it in double curly braces. This means our value will get pretty long! Don’t panic, that’s fine.
Let’s add a title. We can just put in “Power”, since that’s what we’re dealing with. Add {{title=Power}} to your value.
Note: You don’t need to put Power in quotes here.
1
<button type="roll" name="roll_power" value="&{template:powers} {{title=Power}}"></button>
Now when we click the button, we get something in chat!

It’s not much, and it won’t look good until we style it, but lets add some more properties.
We’ve seen how to hardcode a value with the title, but what if we want to pass in information we already have? That’s easy! All we have to do is use @{<atributeName>} inside our double curly brackets, like this: {{name=@{character_name}}}.
If we’re in a repeating section (like powers), we don’t have do to do anything different! We can add our text just like this: {{description=@{description}}.
The name of the attribute does not have to match the name of the property.
Let’s add the rest of our properties:
1
2
3
<button type="roll" name="roll_power"
value="&{template:powers} {{title=Power}} {{name=@{character_name}}} {{description=@{description}}} {{cost=@{cost}}} {{powerName=@{name}}}">
</button>
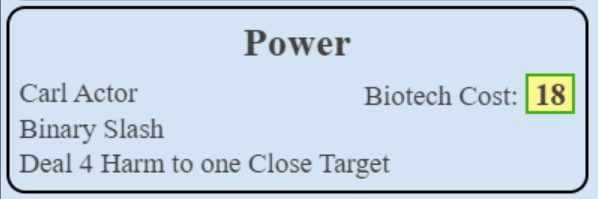
And if we click the button, it works!
 )
Pretty plain, but all our properties are here.
)
Pretty plain, but all our properties are here.
Wait a moment! Isn’t this supposed to be a roll template? Where’s all the ROLLING?
Okay, failure enough. Cyberrats doesn’t do a lot of rolling here, but your game probably does. Possing in a roll is pretty easy, we just use Roll20’s inline roll syntax. Inline rolls let us use roll syntax inside of double square brackets: [[d20+5]]
 I want you to know that my test of the above was a crit
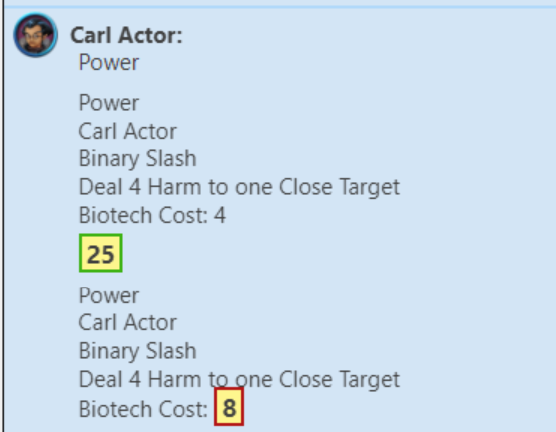
Let’s pretend that instead of reading the cost from the power, we roll 3d6. We simply change {{cost=@{cost}}} to {{cost=[[3d6]]}}
Or, what if we want to make it real fun and roll a number of d6 equal to the cost listed. Can we do that?
You betcha!
{{cost=[[@{cost}d6]]}}
You can even reverse it and roll 6 dice of whatever size the cost is with [[6d@{cost}]].
 Whatever your game needs, Roll20 has the flexibility. It even supports “exploding” dice
I think that’s invocation pretty well covered. Let’s move on to making these looks good!
Styling
Just like we made a new section in the HTML, I recommend making a new “section” in the CSS. Scroll to the bottom of your CSS file and add /* Roll Templates */. Our new code will go below this.
Warning: If you have comments that span multiple lines in your CSS file, Roll20 may not render your Roll Template CSS. Stick to single-line comments.
If you’re using the Element Inspector (and I trust you are), you can use that to peak at what class our roll template has.
 Our friend the element inspector
As you can see, our template has a class of sheet-rolltemplate-powers, so we can use a CSS selector of .sheet-rolltemplate-powers. This will match the base element, so let’s start there.
For each of our sub elements, we can simply use the child (>) or descendant ( ) selectors.
Let’s start with the basics nad get a grid going.
We don’t have a lot of room, so let’s keep it to a 2-column grid.
It can help to sketch out a rough idea of what you’d like the template to look like. For me, I’m thinking I want the title (POWER) across the tab, the character’s name and power cost below that, then the power’s name and the description on the bottom.
Converting this to a grid might look something like this:
1
2
3
4
5
6
7
8
9
10
11
.sheet-rolltemplate-powers {
    display: grid;
    grid-template-areas:
        "powerTitle  powerTitle"
        "powerOperativeName   powerCost"
        "powerName       .     "
        "powerDesc   powerDesc";
    grid-template-columns: 1fr auto;
    grid-template-rows: auto auto  1fr 1fr;
    grid-column-gap: 3px;
}
display: grid; is the most important piece, it changes the formatting. In grid-template-areas we establish the rough area we’re thinking of, and then we size each one using grid-template-rows and grid-template-columns.
Beware! Our last two rows are both listed as 1fr, meaning they will remain the same size. If one of these areas needs to expand (such as if a power has a particularly long description), both of these rows will expand, which can lead to a goofy-looking (e.g. very tall) template card.
It’s better to use
autoso that sections take up as little space as possible.
As with any grid sections, we need to set the grid-area of the divs to match. Let’s update our CSS, using the descendant selector:
1
2
3
4
5
6
7
8
9
10
11
12
13
14
15
16
17
18
19
20
21
22
/* Roll templates */

.sheet-rolltemplate-powers {
 /* ... */
}

.sheet-rolltemplate-powers .sheet-title {
  grid-area: powerTitle;
}

.sheet-rolltemplate-powers .sheet-name {
  grid-area: powerOperativeName;
}

.sheet-rolltemplate-powers .sheet-powerName {
  grid-area: powerName;
}

.sheet-rolltemplate-powers .sheet-description {
  grid-area: powerDesc;
}
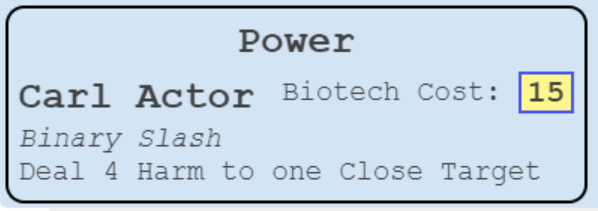
Then we update our CSS and immediately see the effects:
 Oh yeah, that’s a grid all right!
You may notice that when you update the CSS, previously “rolled” templates will update too. That’s because they’ll still be styled be the same sheet. Changes to the HTML, however, will not be reflected; you’ll have to roll again for those.
Now let’s apply some more styling to the base, and to each of these sections!
Making it Prettier
First up, let’s make the title centered, bigger, and with a little but of room below it:
1
2
3
4
5
6
7
.sheet-rolltemplate-powers .sheet-title {
  /* ... */
  text-align: center;
  font-size: 1.4em;
  font-weight: bold;
  margin-bottom: 5px;
}
Then let’s clean up the overall template by changing the font to a monospace one (we’ll learn how to import specific fonts next session), spacing things out a little, and adding a border and some breathing room:
1
2
3
4
5
6
7
8
9
10
11
.sheet-rolltemplate-powers {
    /* ... */
    font-family: "monospace";
    margin: 0 -3px -4px -42px;
    position: relative;
    font-size: 15px;
    line-height: 1.2;
    border-radius: 10px;
    border: 2px solid black;
    padding: 5px;
}
How does that look?
Pretty good!
Let’s italicize our power name, change the font to “Courier New” if it’s available, and make the operative’s name a little more prominent:
1
2
3
4
5
6
7
8
9
10
11
12
13
14
15
16
.sheet-rolltemplate-powers {
    /* ... */
    font-family: "Courier New", monospace;
    /* ... */
}

.sheet-rolltemplate-powers .sheet-name {
  /* ... */
  font-size: 1.4em;
  font-weight: bold;
}

.sheet-rolltemplate-powers .sheet-powerName {
  /* ... */
  font-style: italic;
}
Background image
You can give your roll template (or your entire sheet) an image as a background. This can provide some nice texture to an otherwise boring section.
There’s a really grand collection of seamless textures on Flickr. You can grab one of these subtle ones, or find your own elsewhere. Do be sure that you have permission to use the image, and to license it alongside your character sheet under the MIT license. This is required for Roll20 character sheets.
Eventually, you will need to host your image on Github (we’ll talk more about that in the lats session). You can always use a URL of your choice for now, and change your sheet to point to Roll20’s Github repository after your initial character sheet has been checked in.
For Cyberrats, I used this image for many of my roll templates:
 You can find this image here: https://raw.githubusercontent.com/roll20/roll20-character-sheets/master/Cyberrats/paper-bg.jpg
To set the background, simply use the background-image property, passing in either a url or a relative link to the file (if it’s hosted on the same server). Most of the time, you’ll want a URL:
There are a couple other properties you’ll want to set as well, in case your template grows to an unusual size. If you omit the background-size property, you’ll get all the “crunch” of the texture, which may be hard to read.
1
2
3
4
5
6
.sheet-rolltemplate-powers {
    /* ... */
    background-image: url("https://raw.githubusercontent.com/roll20/roll20-character-sheets/master/Cyberrats/paper-bg.jpg");
    background-repeat: repeat-y;
    background-size: 100% auto;
}
 On the left
 background-size is set to 100% auto. On the right, it’s disabled. Notice the additional “crunch”.
Reusing for weapon
Once we’re happy with our Power Template (and you may not be: feel free to tweak it some more. Maybe you want the title bigger, or the operative name smaller. Go wild!), we can move on to reusing the templates for other things.
Try out your templates with a wide variety of inputs. How does it look if someone has an unusually long character name? If a description is missing, or novel-sized? Players will surprise you!
We could make a whole new template for our weapon attacks. The process would look very similar. But let’s try to reuse the one we just made.
One annoying thing is that we didn’t name our sections very generically: it’s all “power name”, “power cost”. But we can easily work around that. Let’s take a look!
We already know that connecting a button to a template is done through values, so we need to change our repeating-weapon button to have a value that starts with “&{template:powers}”. Once again, we’re lamenting the fact that we didn’t name this something generic, like “template-main”, but we can either rename it (and all our CSS) or live with it. Me? I’m going to live with it.
These kinds of decisions are things you will have to make all the time when doing any kind of development, web or otherwise. A good plan can save lots of rework.
My personal metric for decision whether or not to rewrite something is a function of how long I intend to use it, how many times I expect to repair or maintain it, and how many others I expect to have to build on top if it. The bigger those variables, the more likely I am to rename or rework.
Now we just have to map our properties over. title seems like a straightforward analogue: let’s put in “Weapon”. name can stay the same, and if we can ignore the naming discrepancy, so can powerName. Description we can remove alltogether, and cost simple becomes harm. Let’s take a look:
1
2
3
 <button type="roll" name="roll_weapon"
 value="&{template:powers} {{title=Weapon}} {{name=@{character_name}}}  {{cost=@{harm}}} {{powerName=@{name}}}">
 </button>
If we’d named our repeating-attributes less generically (e.g. “weaponName” instead of “name”), we’d have to change more of this template. That’s why I chose to take advantage of the fact that attribute names inside a repeating section ONLY have to be unique within that same repeating section. It also allows us to write more concise JavaScript in our listeners.
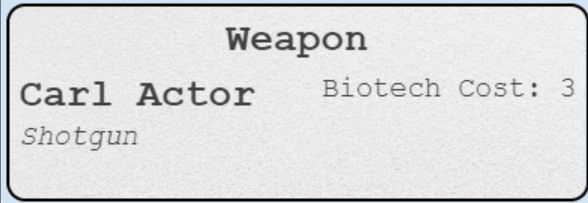
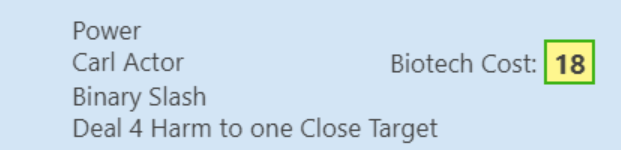
Hmm. It doesn’t look bad, but instead of “Biotech Cost” it should say Harm. And it’s not REALLY a cost, so let’s change it to a new property instead.
We make two changes to our HTML, first the button:
1
<button type="roll" name="roll_weapon" value="&{template:powers} {{title=Weapon}} {{name=@{character_name}}} {{harm=@{harm}}} {{powerName=@{name}}}"></button>
Then the template.
1
2
3
4
5
6
7
8
9
10
11
12
<!-- ... -->
{{#cost}}
<div class="sheet-cost">
    Biotech Cost: {{cost}}
</div>
{{/cost}}

{{#harm}}
<div class="sheet-cost">
    Harm: {{harm}}
</div>
{{/harm}}
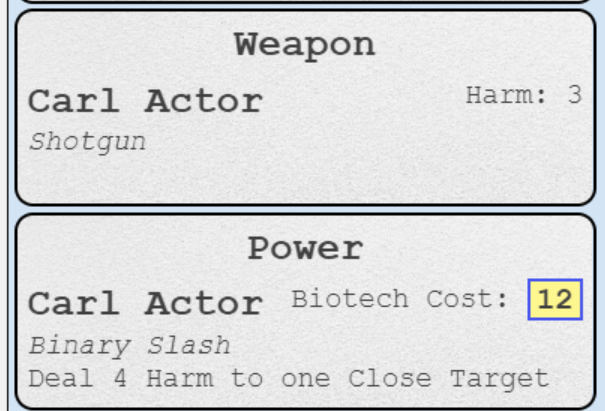
Note that I’m adding a new section right below the #cost section that only shows up if we pass in a Harm variable. And I’m reusing the sheet-cost class because I want to keep the same formatting, just showing “Harm” instead of “Biotech Cost”.
And look at that, both templates work the way we want:
Isolating Dice
What if I want to show all of the dice that were rolled instead of the total? Or, imagine this: what if instead of a power costing a certain number of dice, it rolled a bunch of dice and then took the highest die? That’s pretty easy to do with Roll20 ([[3d6k1]]), but is there a way to combine it with the previous idea? Can we roll 3 dice, show all of those dice AND show the highest one?
We sure can!
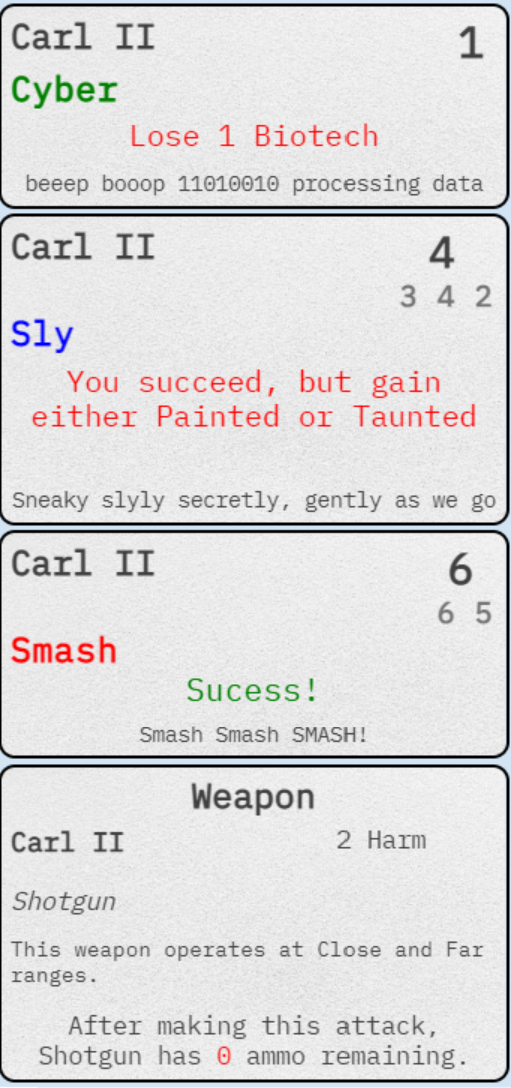
In fact, this is what the actual Cyberrats rolls do for their attributes: we roll X dice (where X is your Smash, Sly, or Cyber score), keep the highest, and show you how we calculated it:
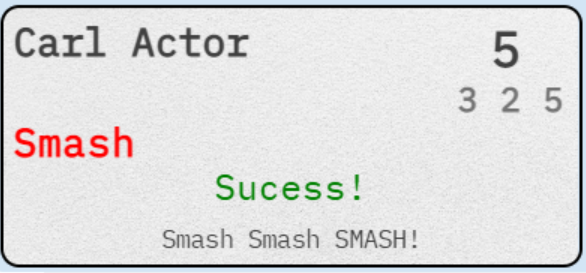 Cyberrats uses conditional sections in the template to check for success, failure, or mixed success
Tip: If you pass in a roll to a templates, Roll20 lets you have conditional checks on whether the roll is greater than a certain value, or between two others. You can even check for a crit. Check it out in the wiki!
So how do we do that? I’ll warn you, it’s rather complex.
Warning: This is an advanced topic. Feel free to skip it. I will not include this code in our “code so far” section.
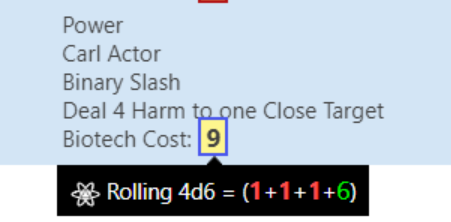
First, we take advantage of the fact that Roll20 lets you index into an inline roll. The syntax for this is $[[X]] where X is the index you want (starting from 0).
Try it yourself: In the Roll20 chat, type [[d6]] + [[d8]] = $[[0]] + $[[1]]
This will roll a d6 and a d8, and show you the results in the opposite order.

So they we make two roll formulas. The first looks like this: '[[{[[d6]], [[d6]]}kh1]]', where we repeat the number of [[d6]]s equal to the number of dice we want (in this case 2), and wrap that in a roll where we only keep the highest result.
The second formula we make is just a string of $[[X]] results starting at zero, to show the individual dice rolls. So the first formula grabs the answer (the highest) and the second parses that value for the individual results.
Once we have each, we just pass them into our template as two separate values (results and roll). Then we can format them so that the result is bigger than the roll.
What does the code actually look like?
Well first, whenever an attribute is changed, we recalculate its formula.
1
2
3
4
5
6
7
8
9
10
11
12
13
14
15
16
17
18
19
20
21
22
23
24
25
26
27
28
29
30
31
32
33
34
35
36
37
38
39

on("change:smash", function(eventInfo) {
console.log(eventInfo);
   const newVal = parseInt(eventInfo.newValue); // MUST convert to number!
   const roll_formula_smash = buildDicePool(newVal); // Build the roll
   const roll_results_smash = getResults(newVal); // Get the highest

// We define these hidden attributes near the datalists in our HTML
   setAttrs({
  roll_formula_smash,
  roll_results_smash,
   });
});

// The helper functions we call (note: also call these on sheet:opened so they are never uninitialized!)

function buildDicePool(numDice) {
  if(numDice == 0) { // For 0 dice we roll 2 and keep the lowest. That's a Cyberrats game rule and may not transfer.
    numDice = 2;
    const rolls = [...Array(numDice)].map(() => "[[d6]]").join(", ");
    return `[[{${rolls}}kl1]]`; // Keep LOWEST not highest
  }

  // I wasn't writing this code with readability in mind. Know that it returns a string that looks like this: '[[{[[d6]], [[d6]]}kh1]]'
  const rolls = [...Array(numDice)].map(() => "[[d6]]").join(", ");
  return `[[{${rolls}}kh1]]`;
}

function getResults(numDice) {
  if(numDice === 0) {
    numDice = 2;
  }
  // Again, this code is not written for a tutorial. It builds a string that looks like this: '$[[0]] $[[1]]'
  // You CAN build this string with a while loop.
  return numDice <= 1
    ? ""
    : [...Array(numDice)].map((_, i) => `$[[${i}]]`).join(" ");
}
Then the HTML button looks like this:
1
2
3
4
<button type="roll"
value="&{template:attributeroll} {{title=Smash}} {{name=@{character_name}}} {{roll=@{roll_formula_smash}}} {{results=@{roll_results_smash}}} {{details=Smash Smash SMASH!}} {{success_at_cost=@{smash_fail}}} {{smash=1}}">

</button>
I know that’s probably overwhelming, and that’s okay!
The last piece of this is the CSS, which is broadly applicable, even if you don’t do the complicated wizardry above.
You can style the dice rolls in your template by modifying the inlinerollresult class. Here’s how Cyberrats does it for the two rolls:
1
2
3
4
5
6
7
8
9
10
11
.sheet-rolltemplate-attributeroll .inlinerollresult {
  border: none !important;
  background-color: transparent;
  font-weight: bold;
  padding: 0 3px 0 0;
  font-size: 1.2em;
}

.sheet-rolltemplate-attributeroll .sheet-main-roll .inlinerollresult {
  font-size: 1.6em;
}
Trigger from an action roll
You can also trigger a roll template from within an action roll button (this is a fairly new feature to Roll20).
Let’s pretend we wanted our weapon button to consume a point of ammunition (the Cyberrats character sheet does this). A roll button can’t do that!
First we change the type of our button “action”, and change the name from “roll_weapon” to “act_weapon”.
1
<button type="action" class="btn d6" name="act_weapon" value=""></button>
Tip: The default action buttons in Roll20 are not styled very well. Add the “btn” class to them. You can also change the symbols on both Roll and Action buttons (cyberrats uses a d6!).
Then we need an action handler.
1
2
3
4
5
6
7
8
9
10
11
12
13
14
15
16
17
18
19
20
21
22
23
24
25
26
27
28
29
30
31
32
33
34
35
36
37
on("clicked:repeating_weapon:weapon", function(eventInfo) {

// Standard fare, get our values.
    getAttrs([
      "repeating_weapon_weaponname",
      "repeating_weapon_weapontext",
      "repeating_weapon_ammo",
      "repeating_weapon_harm"
    ], function(values) {


      // We warn the user if their ammo is low.
      // The ? syntax (called a ternary) here means "check if this is true, if so evaluate what comes before the :, otherwise evaluate what comes after.
      // THe `${}` syntax is used to parse a value inside of a string, getting the literal "values.repeating_weapon_ammo" value, instead of just those words.
        const lowAmmostr = (`${values.repeating_weapon_ammo}` < 2) ? "{{lowAmmo=true}}" : "";

        const ammoStr = `{{ammo=${values.repeating_weapon_ammo -1}}}` + lowAmmostr;

        // Here's the magic! We can start a roll using startRoll and passing in what we would normally pass to the "value" of a roll button!
        // Note that it takes a callback with a results parameter
        startRoll(`&{template:weapon} {{title=Weapon}} {{name=@{character_name}}} {{description=${values.repeating_weapon_weapontext}}} {{weaponname=${values.repeating_weapon_weaponname}}} {{harm=${values.repeating_weapon_harm}}} {{range=${values.repeating_weapon_rangetext}}} ` + ammoStr, function(results) {
            // Inside the callback of every roll, we MUST call finishRoll, and we must pass the results.rollId of the startRoll function
            // If you don't, you will either get an error, or your rolls will take 5 seconds to run! Not great.
              finishRoll(
                  results.rollId,
                  {
                  }
              );
        });

            // After the roll (but still inside the getInfo) we decrease ammo by 1 and set it again.
          setAttrs( {
            repeating_weapon_ammo: values.repeating_weapon_ammo -1
          });
    });
});
Summary
There you have it! You can now make a roll template like the best of them. And you know how to reuse them!
In the next session, we’ll learn about advanced topics, like dark mode, prompting users for input, translations, fake tabs, and more!
Code So Far
This does not include the Action Roll or Isolating Rolls code.
1
2
3
4
5
6
7
8
9
10
11
12
13
14
15
16
17
18
19
20
21
22
23
24
25
26
27
28
29
30
31
32
33
34
35
36
37
38
39
40
41
42
43
44
45
46
47
48
49
50
51
52
53
54
55
56
57
58
59
60
61
62
63
64
65
66
67
68
69
70
71
72
73
74
75
76
77
78
79
80
81
82
83
84
85
86
87
88
89
90
91
92
93
94
95
96
97
98
99
100
101
102
103
104
105
106
107
108
109
110
111
112
113
114
115
116
117
118
119
120
121
122
123
124
125
126
127
128
129
130
131
132
133
134
135
136
137
138
139
140
141
142
143
144
145
146
<div class="character-sheet">
<div class="section header">
<h1>Cyberrats Demo!</h1>
<div class="header-content">
<div class="left">
<span class="character-stat">
<label class="inline" for="character-name">Character Name</label>
<input type="text" spellcheck="false" id="character-name" name="attr_character_name"/>
</span>
</div>
<div class="right">
<div class="character-stat">
<label class="inline" for="character-mutator"> Mutator </label>
<input type="text" spellcheck="false" id="character-mutator" name="attr_mutator"/>
</div>
<div class="character-stat">
<label class="inline" for="corp"> Megacorp </label>
<input type="text" spellcheck="false" list="megacorps" id="corp" name="attr_corp"/>
</div>
<div class="character-stat">
<label class="inline" for="character-career"> Career </label>
<input type="text" spellcheck="false" id="character-career" name="attr_career"/>
</div>
<div class="character-stat">
<label class="inline" for="next-of-kin"> Next of King </label>
<input type="text" spellcheck="false" id="next-of-kin" name="attr_next-of-kin"/>
</div>
</div> <!-- End of Right -->
</div>
</div>
<!-- End of Header div -->
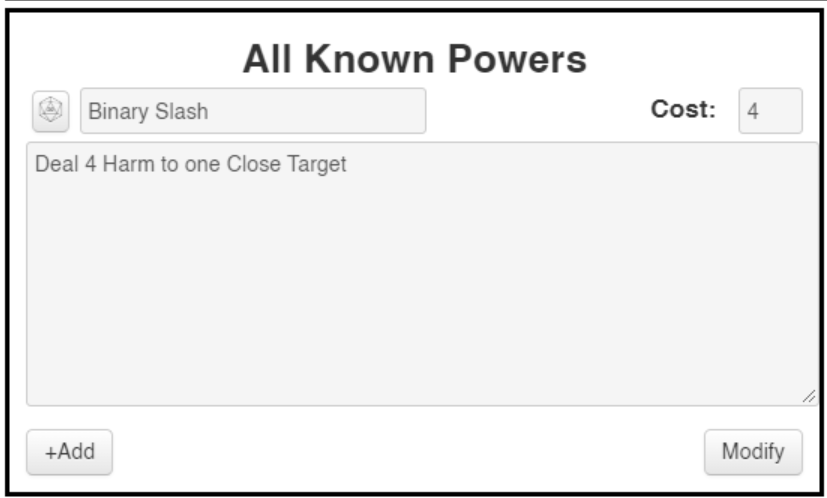
<div class="section powers">
<h2>All Known Powers</h2>
<fieldset class="repeating_powers">
<button type="roll" name="roll_power" value="&{template:powers} {{title=Power}} {{name=@{character_name}}} {{description=@{description}}} {{cost=[[6d@{cost}]]}} {{powerName=@{name}}}"></button>
<input type="text" spellcheck="false" name="attr_name"/>
<span class="pull-right">
<label for="power-cost" class="inline">Cost:</label>
<input type="text" id="power-cost" class="cost" name="attr_cost"/>
</span>
<textarea spellcheck="false" class="vert-only" name="attr_description">
</fieldset>
</div>
<div class="section weapons">
<h2>Weapons</h2>
<fieldset class="repeating_weapon">
<div class="weapon">
<button type="roll" name="roll_weapon" value="&{template:powers} {{title=Weapon}} {{name=@{character_name}}} {{harm=@{harm}}} {{powerName=@{name}}}"></button>
<input class="weapon" spellcheck="false" type="text" name="attr_name" value="Name">
<span class="pull-right">
<label class="harmlabel">Harm</label>
<input class="cost" type="number" name="attr_harm" value="1">
</span>
<span class="ammo">
<label>Ammo:</label>
<input type="number" value="1" name="attr_ammo"></input>
<p class="slash">/</p>
<input type="number" value="1" name="attr_max_ammo"></input>
<button type="action" class="btn reload" name="act_reload">Reload</button>
</span>
</div>
</fieldset>
</div>
<!-- This is the right-hand sidebar -->
<div class="section information">
<h4 class="caption">Portrait of Applicant</h4>
<img class="portrait" name="attr_character_avatar">
</div>
</div>
<!-- Datalists -->
<datalist id="megacorps">
<option>Goldencalf</option>
<option>Gargoyle</option>
<option>Dorsey</option>
</datalist>
<!-- Roll Templates -->
<!-- roll templates -->
<rolltemplate class="sheet-rolltemplate-powers">
{{#title}}
<div class="sheet-title">
{{title}}
</div>
{{/title}}
{{#name}}
<div class="sheet-name">
{{name}}
</div>
{{/name}}
{{#powerName}}
<div class="sheet-powerName">
{{powerName}}
</div>
{{/powerName}}
{{#description}}
<div class="sheet-description">
{{description}}
</div>
{{/description}}
{{#cost}}
<div class="sheet-cost">
Biotech Cost: {{cost}}
</div>
{{/cost}}
{{#harm}}
<div class="sheet-cost">
Harm: {{harm}}
</div>
{{/harm}}
</rolltemplate>
<script type="text/worker">
on("clicked:repeating_weapon:reload", function(eventInfo) {
getAttrs([
"repeating_weapon_max_ammo"
], function(values) {
maxAmmo = parseInt(values.repeating_weapon_max_ammo);
setAttrs({
repeating_weapon_ammo: maxAmmo
});
});
});
</script>
1
2
3
4
5
6
7
8
9
10
11
12
13
14
15
16
17
18
19
20
21
22
23
24
25
26
27
28
29
30
31
32
33
34
35
36
37
38
39
40
41
42
43
44
45
46
47
48
49
50
51
52
53
54
55
56
57
58
59
60
61
62
63
64
65
66
67
68
69
70
71
72
73
74
75
76
77
78
79
80
81
82
83
84
85
86
87
88
89
90
91
92
93
94
95
96
97
98
99
100
101
102
103
104
105
106
107
108
109
110
111
112
113
114
115
116
117
118
119
120
121
122
123
124
125
126
127
128
129
130
131
132
133
134
135
136
137
138
139
140
141
142
143
144
145
146
147
148
149
150
151
152
153
154
155
156
157
158
159
160
161
162
163
164
165
166
167
168
169
170
171
172
h1, h2 {
    text-align:center;
}

label.inline {
    display:inline;
}

.header {
    background-color: #dcdcdc; /* A nice light gray */
    grid-area: header;
}

.information {
    grid-area: information;
}

.powers {
    grid-area: powers;
}

/* This applies to every section */
.section {
    border: 3px solid black;
    padding: 10px;
}

.character-sheet {
  display: grid;
  grid-template-columns: 1.5fr 1fr;
  grid-template-rows: 250px 1fr 1fr;
  grid-template-areas: "header header"
                       "powers information"
                       "weapons information";
  grid-gap: 4px;
  height: 800px;
}

.character-stat {
    display: flex;
    flex-direction: column-reverse;
}

.left, .right {
  display: flex;
  flex-direction: column;
}

.left {
  justify-content: end;
  width: 70%;
}

.header-content {
  display: flex;
  flex-direction: row;
  justify-content: space-between;
  margin-top: -25px;
}

.character-stat label.inline {
    border-top: 2px solid black;
    width: 95%;
    font-variant: small-caps;
}

.cost {
  width: 3em;
}

.pull-right {
  float: right;
}

.vert-only {
  margin-top: 4px;
  resize: vertical;
}

label.harmlabel {
  position: relative;
  bottom: -2px;
  margin-left: 1px;
  margin-right: 0px;
  display: inline;
}

input.weapon {
  width: 40%;
}

span.ammo {
	display: flex;
  margin-bottom: 30px;
  margin-top: 10px;
}

span.ammo > label {
  width: fit-content;
}

span.ammo > p.slash {
  font-size: 2em;
  font-weight: bold;
  position: relative;
  top: 6px;
}

.reload {
  margin-left: 5px;
}

h4.caption {
    font-variant: small-caps;
    text-align: right;
    width: 95%;
}

img.portrait {
    height: 300px; /* Hard coded to a value that looks nice. */
    width: 300px;
}


/* Roll Templates */

.sheet-rolltemplate-powers {
    display: grid;
    grid-template-areas:
        "powerTitle  powerTitle"
        "powerOperativeName   powerCost"
        "powerName       .     "
        "powerDesc   powerDesc";
    grid-template-columns: 1fr auto;
    grid-template-rows: auto auto  1fr 1fr;
    grid-column-gap: 3px;
    font-family: "Courier New", monospace;
    margin: 0 -3px -4px -42px;
    position: relative;
    font-size: 15px;
    line-height: 1.2;
    border-radius: 10px;
    border: 2px solid black;
    padding: 5px;
    background-image: url("https://raw.githubusercontent.com/roll20/roll20-character-sheets/master/Cyberrats/paper-bg.jpg");
    background-repeat: repeat-y;
    background-size: 100% auto;
}

.sheet-rolltemplate-powers .sheet-title {
  grid-area: powerTitle;
  text-align: center;
  font-size: 1.4em;
  font-weight: bold;
  margin-bottom: 5px;

}

.sheet-rolltemplate-powers .sheet-name {
  grid-area: powerOperativeName;
  font-size: 1.4em;
  font-weight: bold;
}

.sheet-rolltemplate-powers .sheet-powerName {
  grid-area: powerName;
  font-style: italic;
}

.sheet-rolltemplate-powers .sheet-description {
  grid-area: powerDesc;
}