
This is the last session where I’ll talk about making changes to your character sheet. Next session will be all about submitting it to Roll20.
Here, you’ll learn about switching between tabs, automating parts of the character sheet, making it compatible with dark mode, and more. We’ll revisit some of the clever techniques we discussed in earlier sessions, and will leave you with all the tools you need to make the character sheet of your dreams.
As always, the Roll20 Wiki is an excellent resource. This is meant to make you aware of the things you can accomplish.
Custom Fonts
You can import a custom font for use with your character sheet or roll templates. The easiest fonts to use are Google Fonts.
In your CSS, simply add @import url('https://fonts.googleapis.com/css?family=Sigmar+One&display=swap');
and then font-family: "Sigmar One". It’s always a good idea to provide multiple font families, in case the import fails (e.g. `font-family: “Sigmar One”, serif).
To import multiple fonts in one statement, join them with a pipe (|):
1
@import url('https://fonts.googleapis.com/css?family=Zilla+Slab|Anton&display=swap');
Some fonts may require a weight to be specified in the import: Open+Sans+Condensed:300. You can learn more about weights on W3Schools.
Translating Your Sheet Into Other Languages
Roll20 has a team of community translators, but you need to set up your sheet with their translation service. This is best done as you build the sheet.
You can find the whole process detailed on the wiki, but it entails 3 things:
- Updating your sheet.json to include a link the translations file
- Creating a translations file for the English words
- using data attributes. You’ll need to add an attribute like
data-i18nto each of your attributes. The value of the attribute should be the text you want translated. The translation service will replace the text inside those elements with the translated version of the text you provide to the attributes.
It’s also possible to get real-time translations from the service from within your own JavaScript functions. This is done by calling the built-in method getTranslationByKey() and passing in the key you want translated.
If it seems like I’m being unusually light on details here, it’s only because I have never used this feature and have limited knowledge of it.
User Input With Roll Queries
You can use a Roll Query to provide players with a popup containing either a dropdown or free-form text / number field to the player. You can use the result of this in your macro roll.
For example, you can prompt the player to enter in bonus damage, extra dice they should add, or even the size and number of dice to roll. Pretty handy!
Switching Tabs
Cyberrats uses two different ways to “switch tabs”, but they both operate on the same principles.
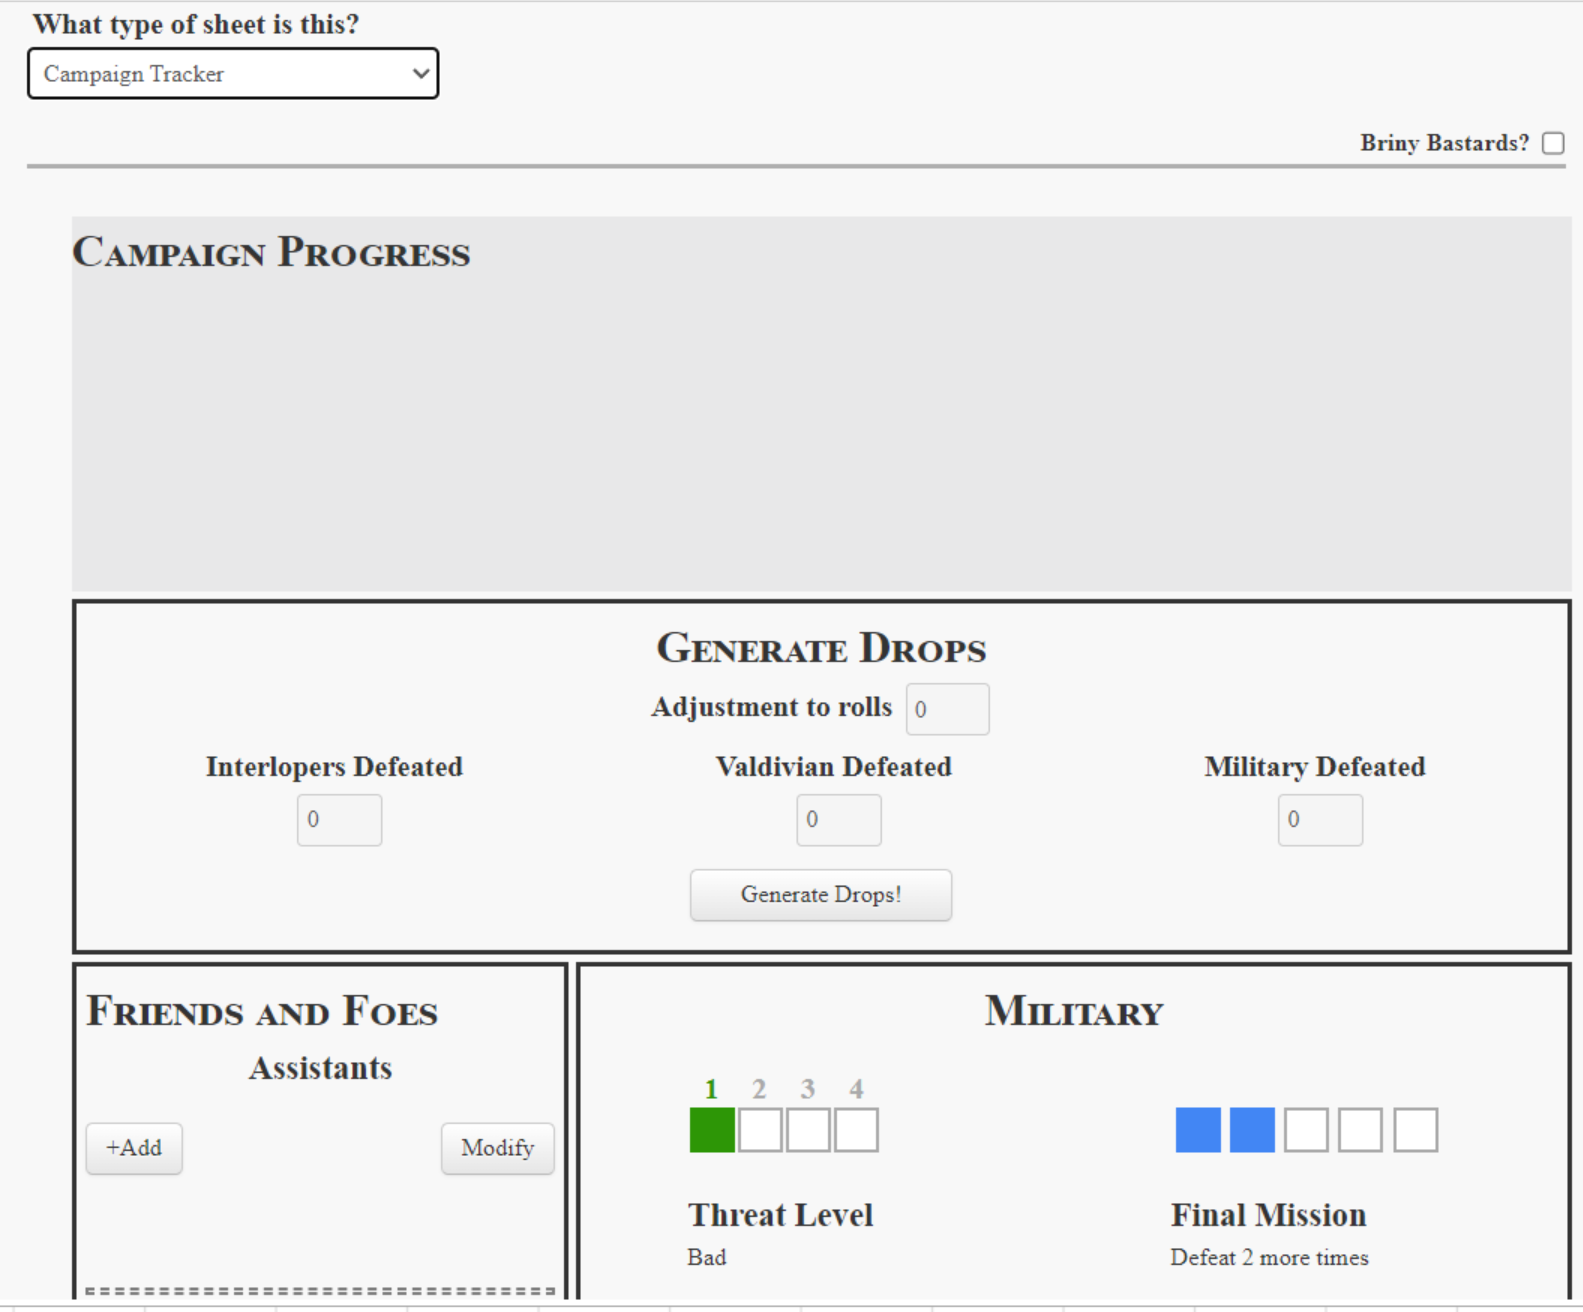
The first way is with a dropdown, where we ask players to pick what kind of sheet they are using: a character sheet, a campaign sheet, or a base sheet (Cyberrats has basebuilding!)
 Character
 Campaign
 Base
Base
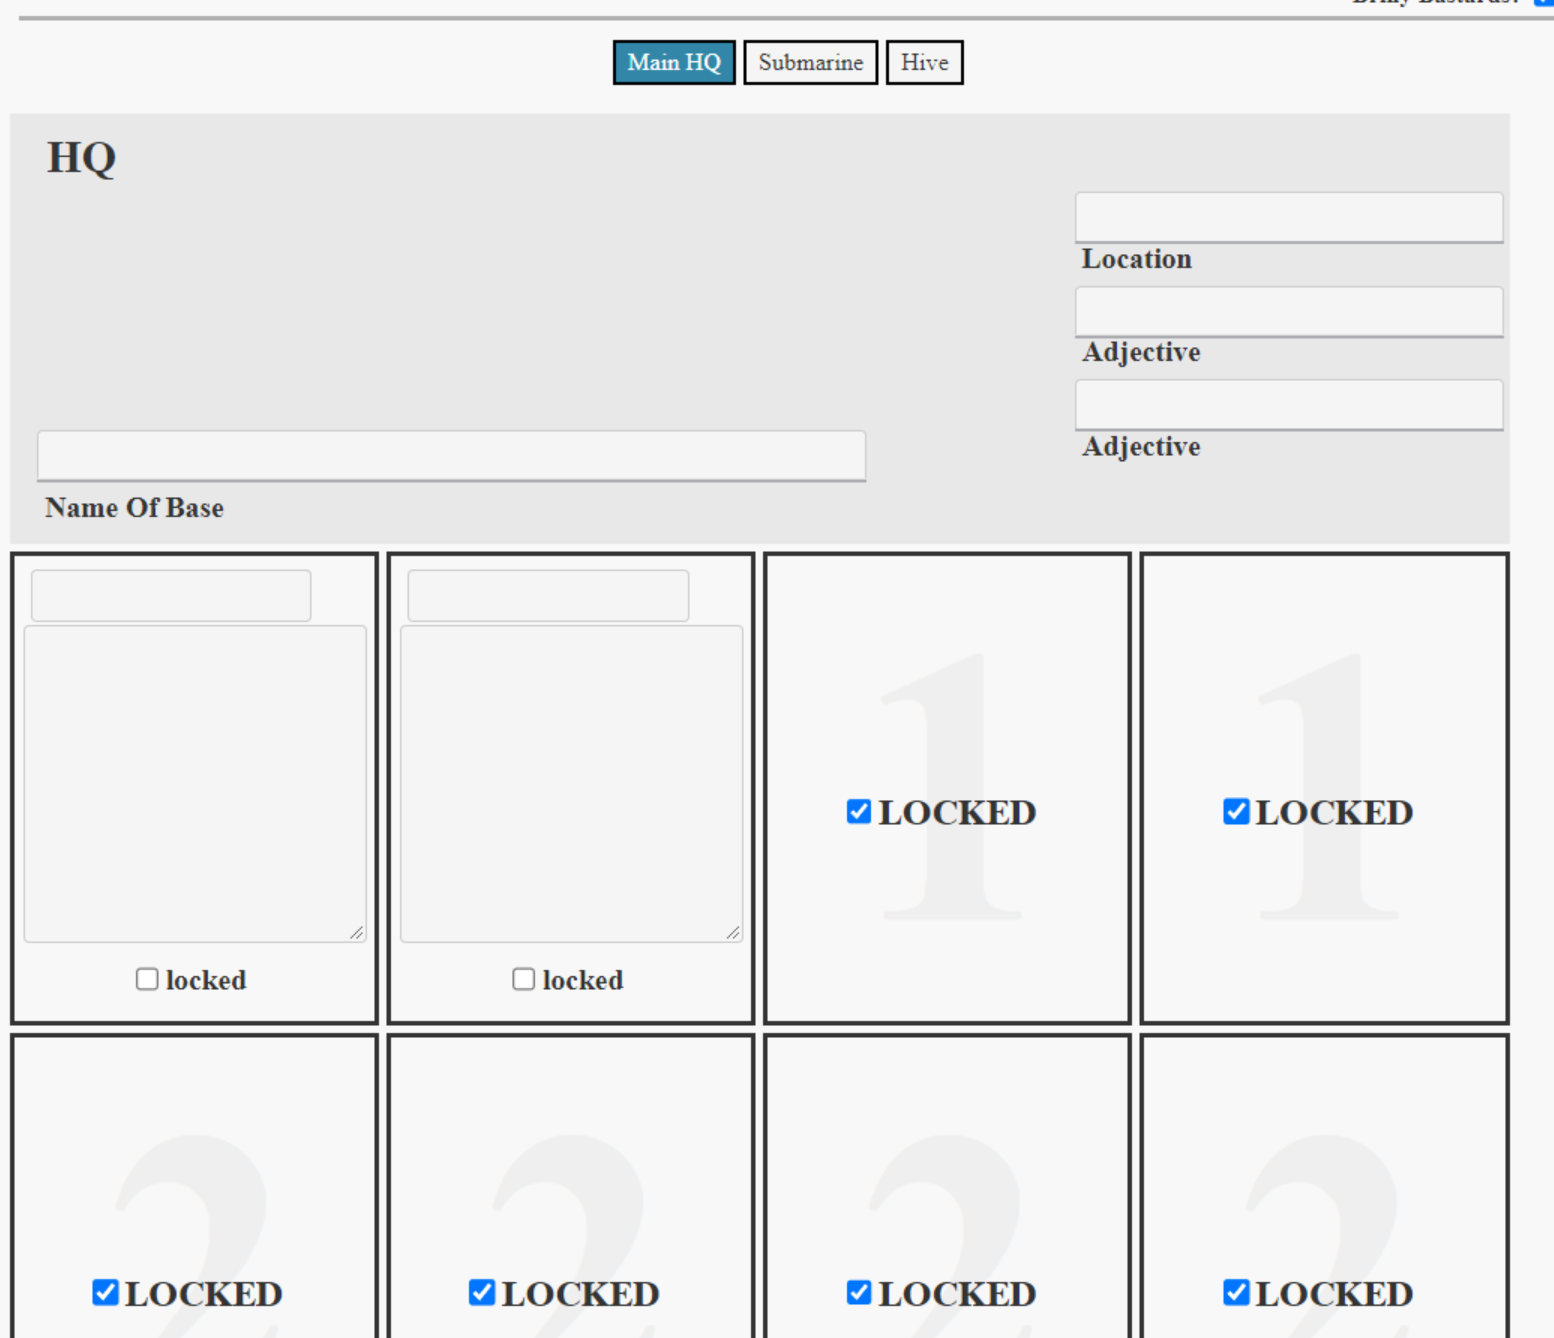
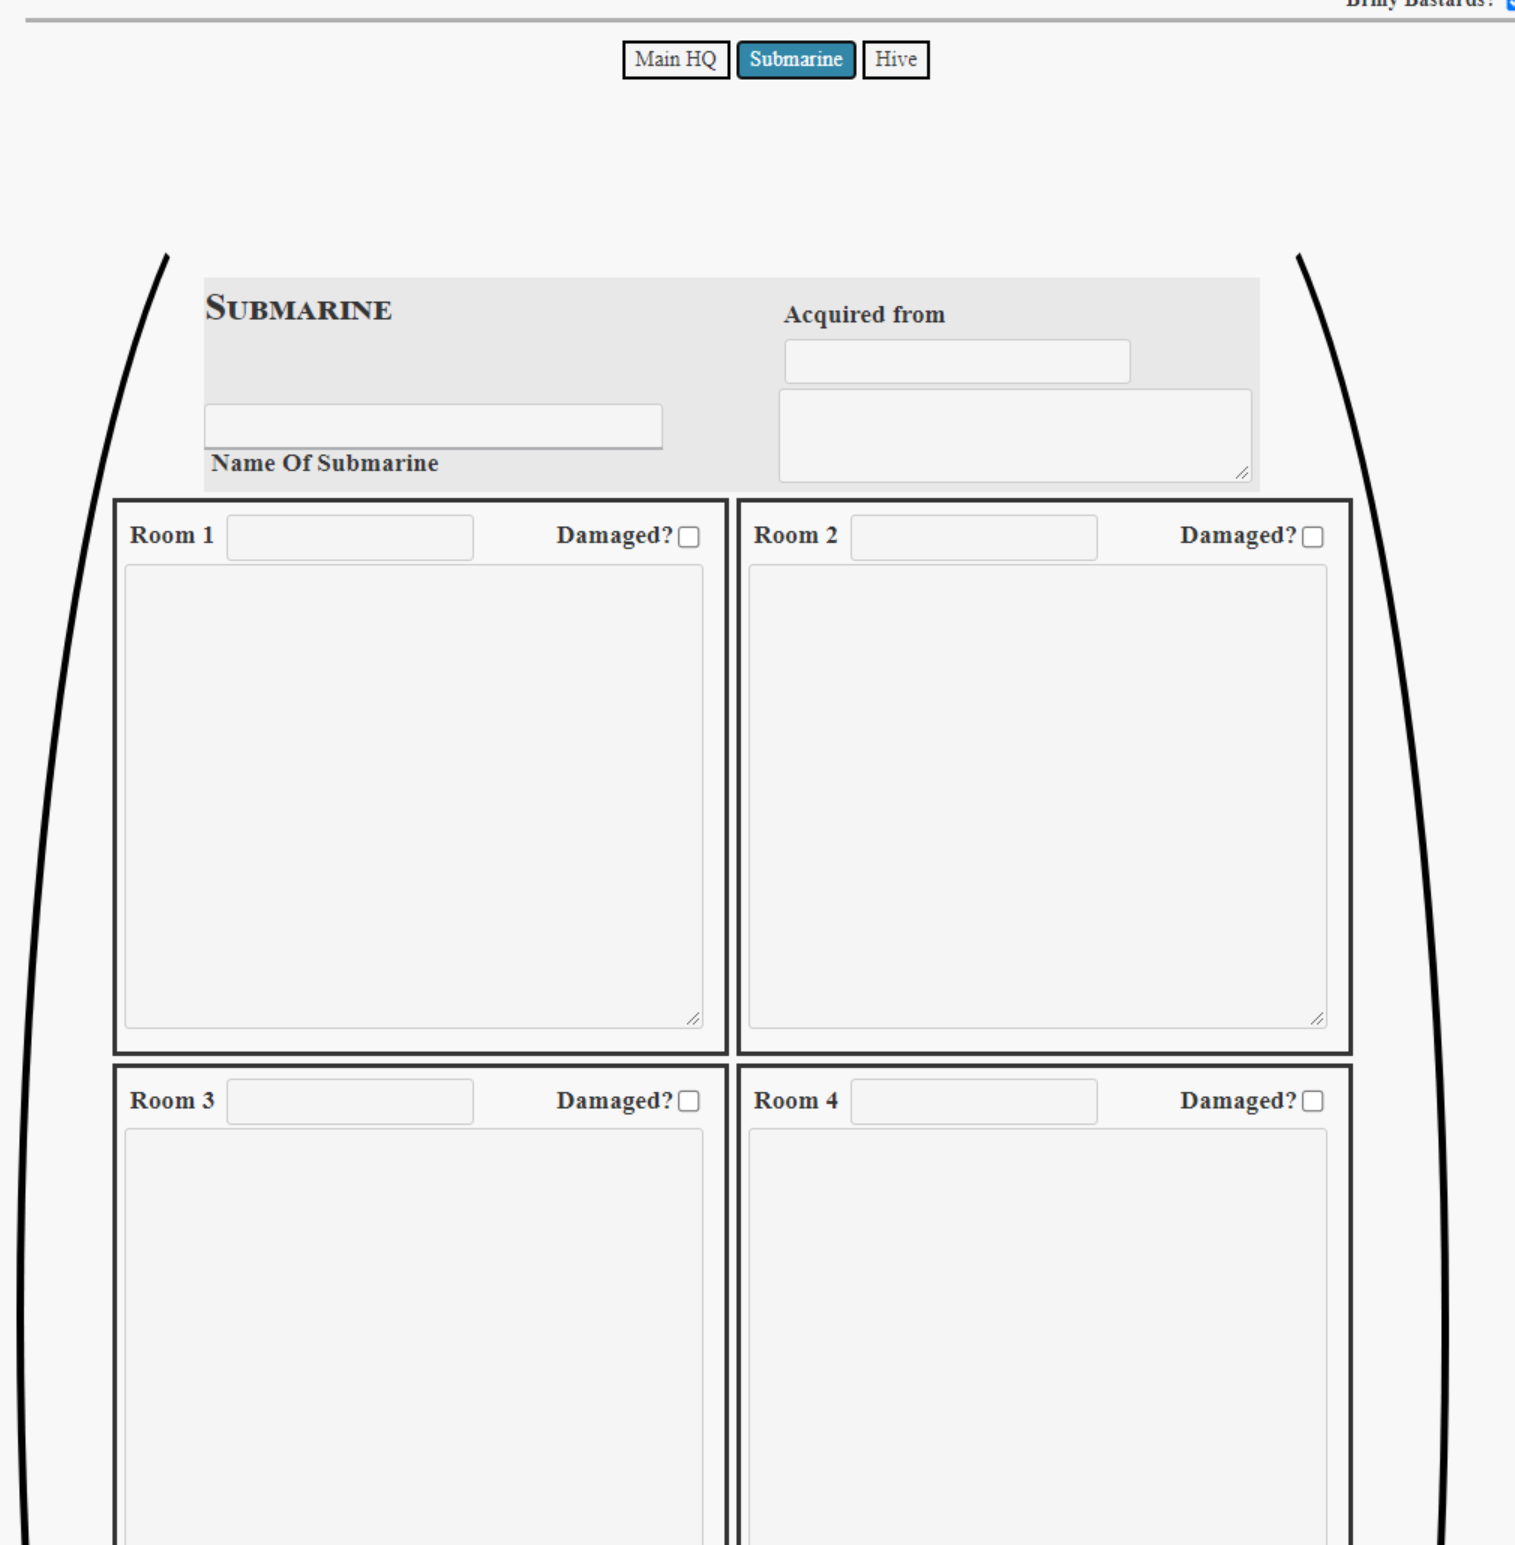
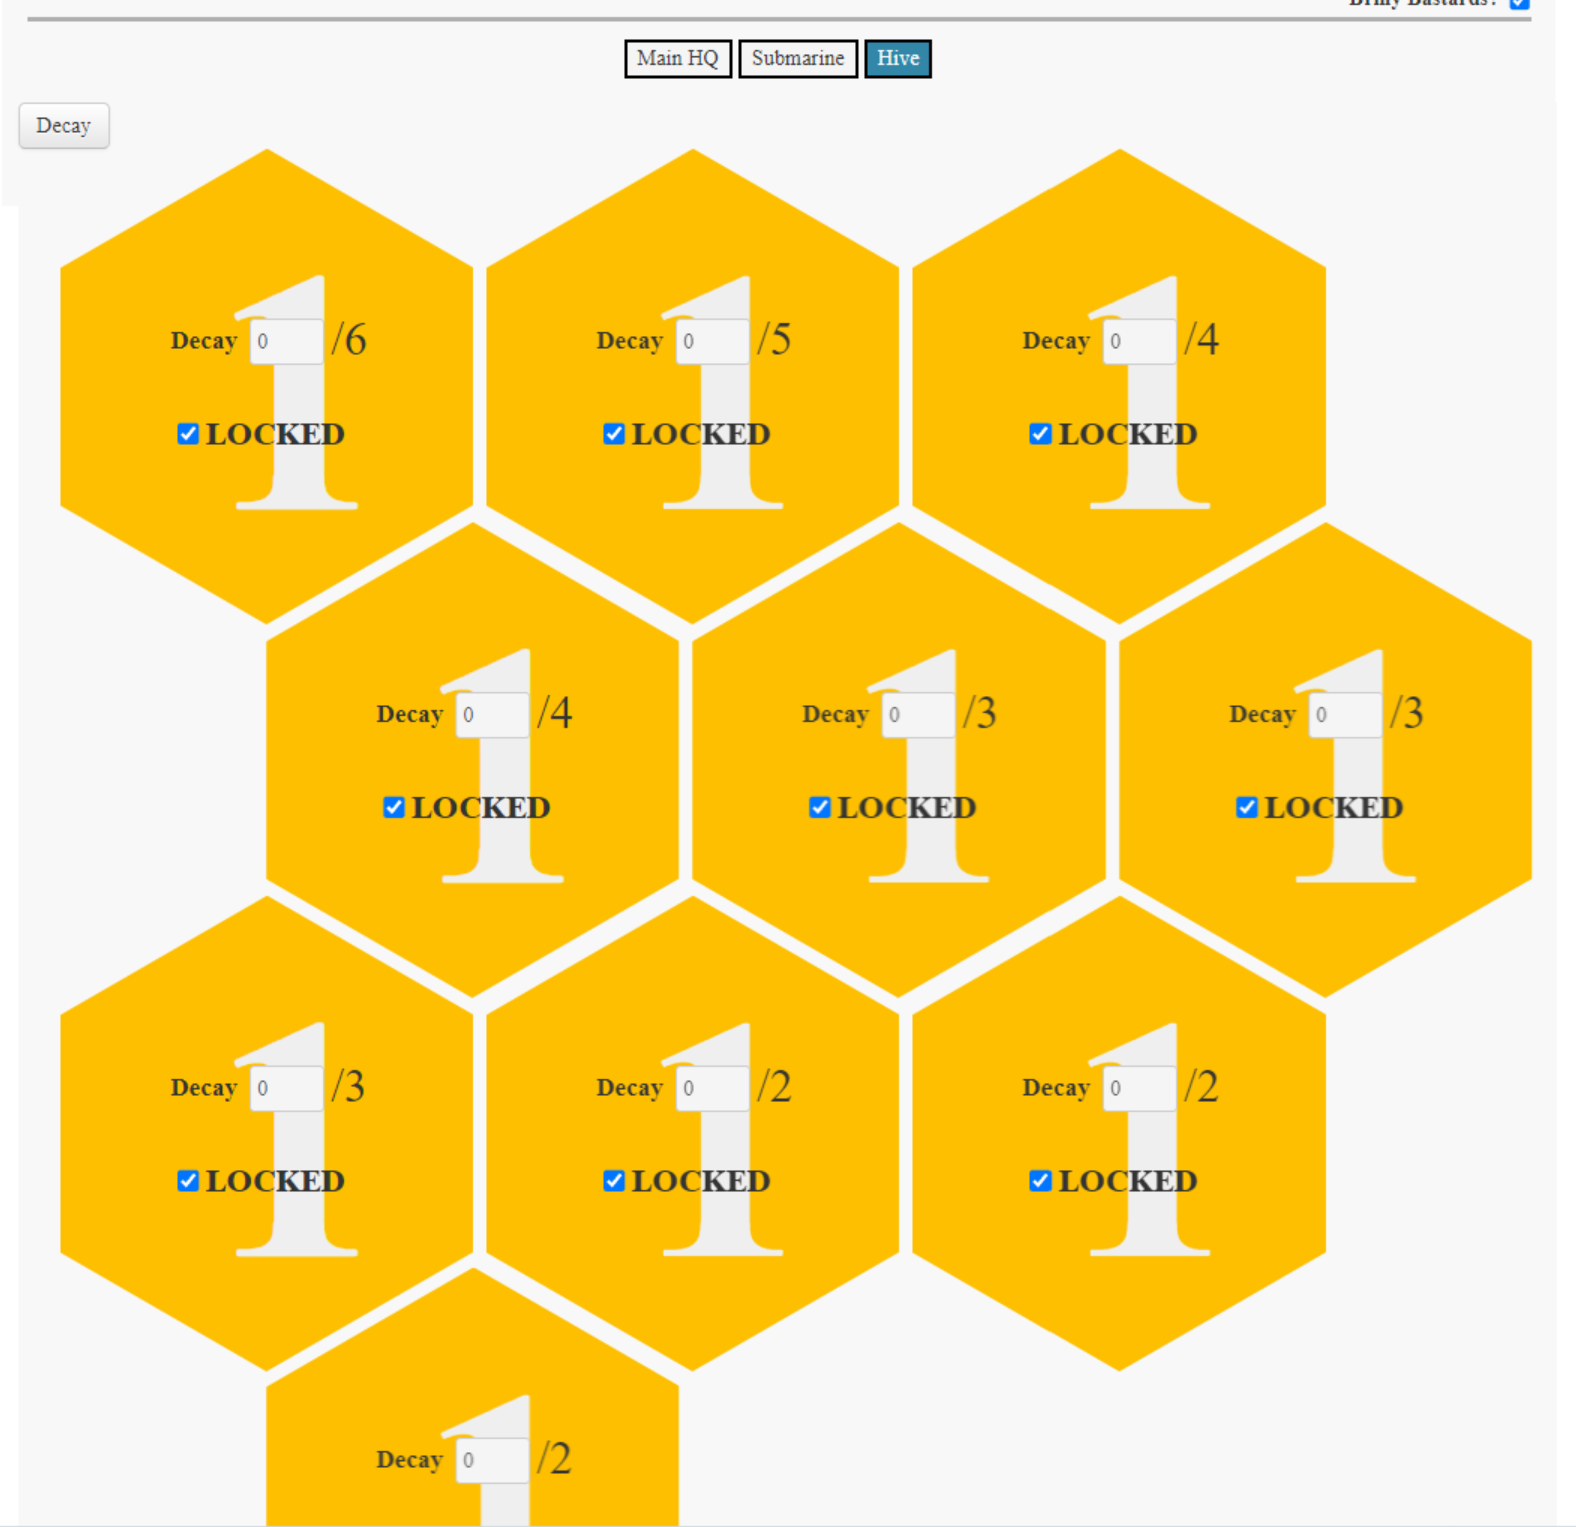
The second way is with fake “tabs” that the player can click on. We use these on the base sheet to differentiate between the main headquarters, the submarine, and the “beehive” that can be unlocked in the game’s first expansion, Rise of the Briny Bastards.
 Main HQ
 Submarine
Main HQ
Submarine
Main HQ
 Beehive
As you can see, even though Roll20 only allows you to have one character sheet associated with your game (or loaded in at one time), we can use “tabs” to emulate having more sheets: the cyberrats character sheet has five “sheets” hidden within it.
So how do we do it?
First, we give the user some way to make a choice. Here’s our dropdown:
1
2
3
4
5
<select name="attr_sheet_type">
    <option value="charactersheet">Character</option>
    <option value="basesheet">Base</option>
    <option value="campaignsheet">Campaign Tracker</option>
</select>
Then we listen for a change with JavaScript:
1
2
3
4
5
on("change:sheet_type", function(eventInfo) {
    setAttrs({
          sheetTab: eventInfo.newValue
      });
});
At the very top of our HTML, we have a hidden input (sheetTab) that we’re storing this state in.
1
 <input type="hidden" class="tabstoggle" name="attr_sheetTab"  value="charactersheet"  />
Then, we could either duplicate that hidden input right above each of the sections (div.campaignsheet, div.charactersheet, and div.basesheet), or we can simply write CSS selectors based off of their relationship to the top of the document.
I find it easier to read to duplicate the hidden input, which gives us CSS that looks something like this:
1
2
3
4
5
6
7
8
9
10
11
12
13
14
/* HIde them all by default */
.charactersheet,
.basesheet,
.campaignsheet {
    display: none;
    background-color: #f8f8f8;
}

/* Note the class (tabstoggle) is the same as our HTML. Then we use the sibling selector. */
.tabstoggle[value="basesheet"] ~ div.basesheet,
.tabstoggle[value="charactersheet"] ~ div.charactersheet,
.tabstoggle[value="campaignsheet"] ~ div.campaignsheet {
    display: block;
}
Hiding / Showing content from expansions
Hiding and showing content based on an expansion is really just a different flavor of the previous trick. This time, I’ll show you the other way of doing it, rather than repeating the hidden element throughout your HTML.
At the top of our HTML, we have a checkbox that can enable our Briny Bastards expansion.
1
2
3
4
<span class="briny-setting">
    <label class="inline setting">Briny Bastards?</label>
    <input class="sheet-briny" name="attr_briny" type="checkbox">
</span>
I also repeat this hidden input ONCE at the top of the character sheet, since you can’t “back out” of a span.
So our campaign sheet, our base sheet, and our character sheet are all siblings with a checkbox:
1
2
3
4
5
6
7
8
9
10
11
12
<div class="allContent">
    <input class="hidden sheet-briny" name="attr_briny" type="hidden">
    <div class="campaignSheet">
        <!-- ... -->
    </div>
    <div class="baseSheet">
        <!-- ... -->
    </div>
    <div class="characterSheet">
        <!-- ... -->
    </div>
</div>
Then we just use CSS to match:
1
2
3
4
5
6
/* Hide the Briny Bastards lieutenants page if we're not on BB mode */
/* This looks for something with the class of lieutenants (happens to be a div) that is a descendant of something with a class of campaignsheet that is siblings with a button of class "sheet-briny". */
/* If it finds one that isn't checked, it hides the section. Brilliant! */
input.sheet-briny:not(:checked) ~ .campaignSheet .lieutenants {
  display: none;
}
Hidden Attributes (and locations!)
I hope those last two sections have shown you the benefit of using hidden attributes to repeat information, and to conditionally hide and show parts of your character sheet.
Repeating hidden attributes is also nice to simplify your CSS selectors, or even to make selections possible. Remember, CSS only goes forward, so there’s no way to match “A div that follows a span where inside that span is a checkbox with a given class. Can’t be done.
Instead, simply duplicate a hidden attribute with the same name somewhere you can match, like right before the div in question.
Showing Data multiple places
A very common trick is wanting to show the same piece of information in multiple places, like the character name, for example.
This is super easy! If the data should be modifiable, you can simply copy the input to multiple places. As long as it has the same name HTML attribute (starting with “attr_”), all the inputs refer to the same underlying Roll20 attribute!
If you want a readonly copy, like to have one area where information is set, and to display that information elsewhere, you can simply create a span and give it the HTML name attribute of “attr_” for the data you want to display.
Filtering Repeating Sections
Cyberrats does an interesting thing with powers. At the top of the character sheet, you can enter in all known powers, and each power has an “equipped?” checkbox (and corresponding attribute).
Then, lower on the character sheet, there’s a “loadout” section where only the equipped powers are shown.
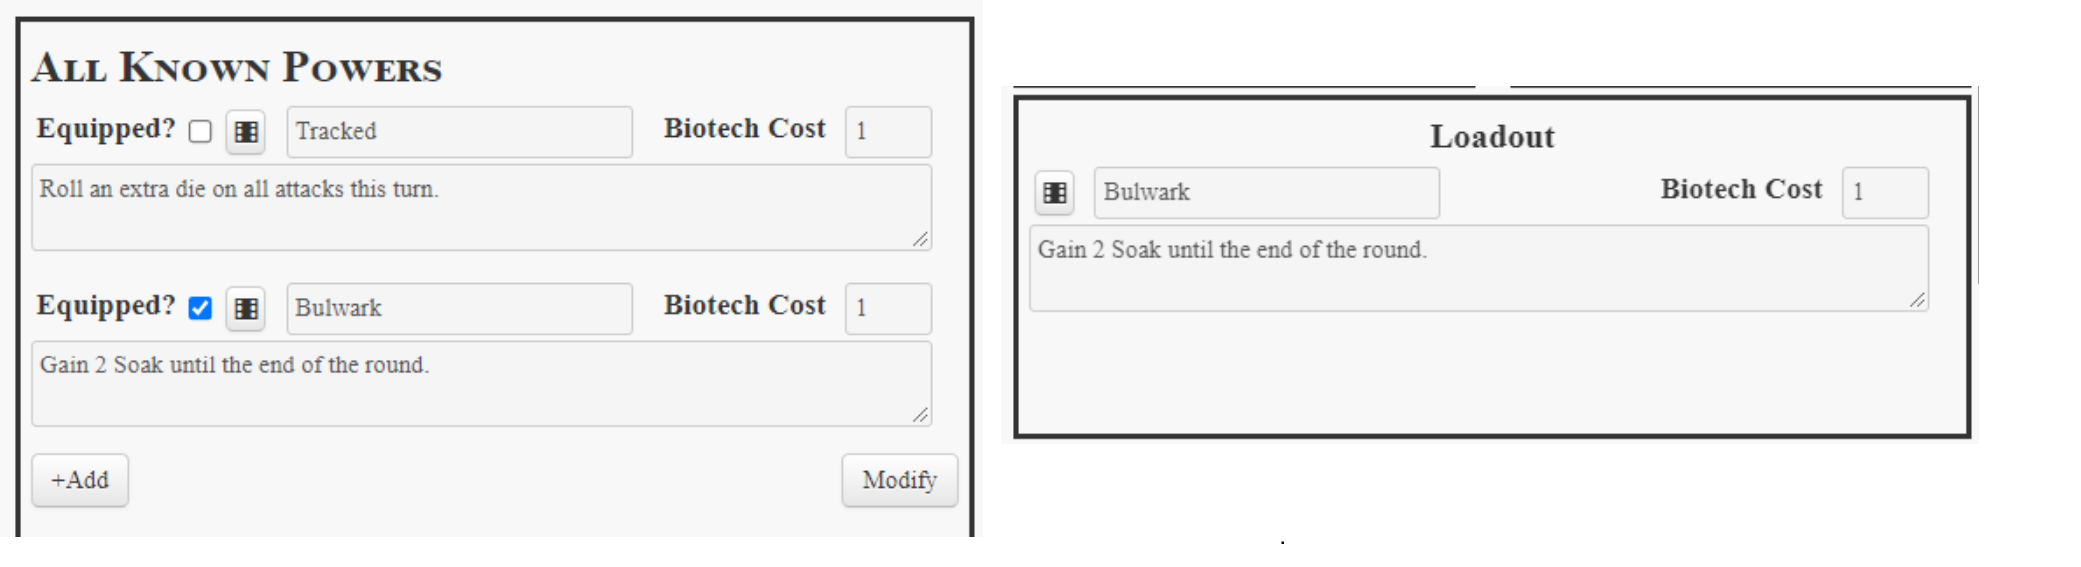
So how’s it work?
Well, first we just repeat the fieldset that represents our repeating section, but with a couple changes.
The originaL
1
2
3
4
5
6
7
8
9
10
11
 <fieldset class="repeating_powers">
    <label class="inline">Equipped?</label>
    <input class="equippedpower" type="checkbox" name="attr_equipped">
    <button type="roll"  name="roll_power" value="&{template:powers} {{title=Power}} {{name=@{character_name}}} {{description=@{powertext}}} {{cost=@{powercost}}} {{powerName=@{powername}}}"></button>
    <input class="powername" spellcheck="false" type="text" name="attr_powername" value="Name">
    <span class="right">
      <label class="inline">Biotech Cost</label>
      <input class="cost" type="text" name="attr_powercost" value="">
    </span>
    <textarea class="maxwidth" spellcheck="false" name="attr_powertext"></textarea>
  </fieldset>
And the filtered:
1
2
3
4
5
6
7
8
9
10
    <fieldset class="repeating_powers filtered_powers">
      <input class="hidden equipped" type="checkbox" name="attr_equipped">
      <button type="roll"  name="roll_power" value="&{template:powers} {{title=Power}} {{name=@{character_name}}} {{description=@{powertext}}} {{cost=@{powercost}}} {{powerName=@{powername}}}"></button>
      <input class="powername" spellcheck="false" type="text" name="attr_powername" value="Name">
      <span class="right">
        <label class="inline">Biotech Cost</label>
        <input class="cost" type="text" name="attr_powercost" value="">
      </span>
      <textarea class="maxwidth" class="powertext" spellcheck="false" name="attr_powertext"></textarea>
    </fieldset>
First we add a new class (I called it filtered_powers). Then we just make two changes: First, we hide the add/modify buttons. These have the class “repcontrol” (given by Roll20).
1
2
3
.filtered_powers ~.repcontrol {
  display: none; /* Hide the add/modify buttons*/
}
We only want to hide these controls if they’re siblings of our filtered_powers list, not always!
The second thing we notice is that in our loadout (that is, our filtered) section, we gave our “Equipped” input a class of equipped. In the original, it just has class equippedpower. This lets us use the following CSS to hide the filtered items:
1
2
3
input.equipped:not(:checked) ~ * {
  display:none !important; /*This has to be important because labels do NOT want to hide.*/
}
This CSS is a but of a cudgel: the * selector can match any element, it uses !important, which I’ve warned against elsewhere, and (most dangerous of all!) it can affect any input with a class of equipped, not just ones in our filtered section.
A more delicate approach would be to add selectors so that this only affects children of repitems that are children of a .filtered_power.
Either way, it’ll get the job done, just be careful.
Datalists
We talked a little bit about datalists previously, but I want to mention them again. They’re excellent because they provide the guidance of a select (dropdown) and the freedom of an input.
You should use these liberally throughout your character sheet, when a guided input is desired. I’ll go so far as to say that if your instinct is to reach for a dropdown, you should strongly consider using one of these instead.
Did I forget your favorite color? With a dropdown you’re out of luck. But check out the datalist:
If your favorite color isn’t there, you can pick purple, the best color simply type it in!
To make one of these, you need two parts: the input element (with type="text" and list=<id>) and the datalist element, which contains the options you want to populate. The datalist must have an id attribute equal to the list that you passed in.
1
2
3
4
5
6
7
8
9
10
11
<label for="color">Pick your favorite color:</label>
<input list="colors" type="text" id="color">

<datalist id="colors">
    <option>Blue</option>
    <option>Red</option>
    <option>Cyan</option>
    <option>Magenta</option>
    <option>Yellow</option>
    <option>Purple</option>
</datalist>
I recommend keeping your datalists in their own section of your HTML, just above the Roll Templates, but you can also keep then near the input they’ll be used by, if you prefer.
Auto Completing Text
If you’ve got a lot of text that players might be typing, you can make it easier for them. Cyberrats does this with rooms: there are a bunch of rooms in the game, all providing benefits, but MAN are those benefits long!
So we help players out by providing a datalist for the name, and a JavaScript listener that checks if it changes.
If we recognize the new name, we automatically set the text of the room to match.
The HTML is pretty straightforward, just an input (tied to a datalist) for the name, and a textarea for the description.
1
2
3
4
5
6
7
8
9
10
11
12
13
14
15
16
17
18
19
20
21
22
23
24
25
26
27
<input type="text" list="corebuildings" class="buildinglist corebuildings" name="attr_buildingnameroom1"></input>
<textarea class="roomtext" spellcheck="false" name="attr_roomtext1"></textarea>
<!-- ... -->
<!-- 15 more of these, numbered attr_buildingnameroom2 through attr_buildingnameroom15 -->


<!-- ... -->
<!-- Names of rooms we know about -->
<datalist id="corebuildings">
    <option>Armory</option>
    <option>Auguary</option>
    <option>Clinic</option>
    <option>Debt House</option>
    <option>Detonatorium</option>
    <option>Engineering Lab</option>
    <option>Gambling Den</option>
    <option>Gym</option>
    <option>Intel Center</option>
    <option>Interloper Ops</option>
    <option>Intern Recycler</option>
    <option>Plasma Lounge</option>
    <option>Refinery</option>
    <option>Smith</option>
    <option>Training Grounds</option>
    <option>Trauma Ward</option>
    <option>Valdivian Ops</option>
</datalist>
The real magic happens with JavaScript:
1
2
3
4
5
6
7
8
9
10
11
12
13
14
15
16
17
18
19
20
21
22
23
24
25
26
27
28
29
30
31
32
33
34
35
36
37
38
39
40
41
42
43
44
45
46
47
48
49
50
51
52
53
54
55
56
57
58
59
60
61
62
63
64
65
66
67
68
69
70
71
72
73
74
75
76
77
78
79
80
81
82
83
84
85
86
87
88
89
90
// Massive listener because I had 16 rooms, all with the same behavior.
on("change:buildingnameroom1 change:buildingnameroom2 change:buildingnameroom3 change:buildingnameroom4 change:buildingnameroom5 change:buildingnameroom6 change:buildingnameroom7 change:buildingnameroom8 change:buildingnameroom9 change:buildingnameroom10 change:buildingnameroom11 change:buildingnameroom12 change:buildingnameroom13 change:buildingnameroom14 change:buildingnameroom15 change:buildingnameroom16 ", function(eventInfo){

// Don't worry about the details here, this is just me grabbing the room number. I could have done this in an easier to read way, but this is "real" code, not code I wrote for the tutorial.
  const roomNumber = eventInfo.sourceAttribute.match(/\d+/).shift(); // regex to grab the number from a string. Relies on naming scheme.

  const room = eventInfo.newValue; // The text entered into our input; that is, the new room name.

// "Roomkey" is something like "roomtext1".
// And look at that! It's the same name as our textarea above.
  const roomKey = "roomtext" + roomNumber; // Relying on attribute naming scheme.

  getAttrs(["briny"], (values) => {
    const details = getRoomDetails(room); // Defined below. The REAL heavy lifting.


// The `${}` syntax is called string interpolation,
//and allows you to evaluate the results of a variable (e.g. roomKey)
// Instead of the literal text "roomKey"
    setAttrs(
      {
        [`${roomKey}`]: details
      }
    );
  });
});

// This is an object that's acting like an enum.
// Basically we're just avoiding typing a single string
// multiple times in our code, and instead using a variable
// (e.g. Rooms.Armory). It helps prevent errors caused
// By typos and capitalization. It can also add clarity.
const Rooms = {
  Armory: "Armory",
  Auguary: "Auguary",
  Clinic: "Clinic",
  Debt_House: "Debt House",
  Detonatorium: "Detonatorium",
  Engineering_Lab: "Engineering Lab",
  Gambling_Den: "Gambling Den",
  Gym: "Gym",
  Intel_Center: "Intel Center",
  Interloper_Ops: "Interloper Ops",
  Intern_Recycler: "Intern Recycler",
  Plasma_Lounge: "Plasma Lounge"
  // And so on....
};

function getRoomDetails(room) {

// A switch statement is like a series of "if-else" statements
// You switch() on the variable you want, and check it against a bunch of predefined values.


// Normally you'd end a statement with break;
// But since we return, there's no need.
// Remember, nothing executes after a return.
// Be careful with these: if you don't return or break,
// You might accidentally execute multiple cases!!

  switch(room) {
  case Rooms.Armory: // This only works because of the enum we defined above.
    return `Unlocks all of the armor and armor tags for purchase.`;
  case Rooms.Auguary:
      return `Unlocks the Augury powers for purchase by any Operative`;

  case Rooms.Clinic:
      return `Injured Operatives can be healed by any Operative(s) spending 2 Scrip during downtime. Each time any Operative uses the Clinic, the cost increases by 1 Scrip.\r\nCurrent cost:`;

  case Rooms.Debt_House:
      return `All Operatives on the primary mission roll an extra d6 for Scrip.`;

  case Rooms.Detonatorium:
      return `Unlocks the Grenade Launcher Weapon and Grenade item.`;

  case Rooms.Engineering_Lab:
      return `Unlocks the Arcsword, Plasgun and all of the weapon tags for purchase.`;

  case Rooms.Gambling_Den:
      return `Operatives on the secondary mission roll 1d6 for Scrip instead of always gaining 2 Scrip.`;

  case Rooms.Gym:
      return `Operatives can obtain one cost 0 power from any other Career.`;

/// And so on...

  default:
      return "";
  }
}
Always assume your users know better than you. Don’t restrict what they can do.
There’s a lot of new things happening in the JavaScript above. Enums! Switch statements! String Interpolation! Don’t worry. First, this is the advanced section, so it’s okay to be a little lost.
Second, the general ideas should be clear:
- Let the users choose from a predefined list of options (but don’t restrict them to that list if possible!)
- Based on their selection, get some longer piece of text (we can use a function with a lot of
ifelsestatements!) - Use
setAttrsto fill a related textarea with complex data (e.g. a paragraph) based on the simple data the user selected.
You should be able to do that, and your players will thank you for the time saved!
You can see how this allows flexibility AND time saving: if a Manager wants to homebrew a room (or buy an expansion with new ones), they aren’t restricted by a character sheet that didn’t know about them.
Dark Mode
Recently, Roll20 added a Dark Mode toggle to their website. Previously, some sheet authors would make their own homebrew dark modes, but for new sheets, it’s better to respect the site switch (on the left side of the play area, at the time of writing).
When a player turns Dark Mode on, the body of the HTML will get an additional property called sheet-darkmode. So you just need to have new CSS that looks for this.
My recommendation is to put this new CSS at the very bottom of your CSS file. This is because conflicts of equal specificity are resolved by giving preference to CSS rules that occur later in the file. If you put these rules at the top, they made not take effect.
I’ll share the rules Cyberrats uses. Most of the rules on the body element are just defining variables that I can re-use on all children of body.
1
2
3
4
5
6
7
8
9
10
11
12
13
14
15
16
17
18
19
20
21
22
23
24
25
26
27
28
29
30
31
32
33
34
35
36
37
38
39
40
41
42
43
44
45
46
47
48
49
50
51
52
53
54
55
56
57
58
59
60
61
62
63
64
65
66
67
68
69
70
71
72
73
74
75
76
77
78
79
80
81
82
83
84
85
86
87
88
89
90
91
92
93
94
95
96
97
98
99
100
101
102
103
104
105
106
107
108
109
110
111
112
113
114
115
116
117
118
119
120
121
122
123
124
125
126
127
128
129
130
131
132
133
134
135
136
137
138
139
140
141
142
143
144
145
146
147
148
149
150
151
152
153
154
155
156
157
158
159
160
161
162
163
164
165
166
167
168
169
170
171
172
173
174
175
176
177
178
179
180
181
182
183
184
185
186
187
188
189
190
191
192
193
194
195
196
197
198
199
200
201
202
203
204
205
206
207
208
209
210
211
212
213
214
215
/* Decalre variables and set background color  */
body.sheet-darkmode  {
  --backgroundDark: #282828;
  --backgroundDarkOffset: #1e1e1e;
  --colorDark: #eee;
  --colorLight: #dcdcdc;
  --gentleOrange: #d79921;
  --orange: orange;
  --accentBlue: #458588;

  --threatLevel4ColorDark: #9d0006;
  --threatLevel3ColorDark: #af3a03;
  --threatLevel2ColorDark: #d79921;
  --threatLevel1ColorDark: #427b58;

  background: var(--backgroundDark);
}

/* Set default color and background color on all common elements */
body.sheet-darkmode button,
body.sheet-darkmode input,
body.sheet-darkmode optgroup,
body.sheet-darkmode select,
body.sheet-darkmode textarea,
body.sheet-darkmode label,
body.sheet-darkmode .charsheet {
  color: var(--colorDark);
  background-color: var(--backgroundDarkOffset);
}

/* Clean up some buttons */
body.sheet-darkmode .btn,
body.sheet-darkmode .btn.btn-default {
  color: #c8c3bc;
  text-shadow: rgba(24,26,27,.75) 0px 1px 1px;
  background-color: var(--backgroundDark);
  background-image: linear-gradient(#181a1b, #26292b);
  border-color: #3e4446 #3e4446 #43494c;
  box-shadow: rgba(24,26,27,.2) 0px 1px 0px inset,rgba(0,0,0,.05) 0px 1px 2px
}

/* Add a border-color to many elements */
body.sheet-darkmode button,
body.sheet-darkmode textarea,
body.sheet-darkmode hr,
body.sheet-darkmode input {
  border-color: var(--gentleOrange) !important;
}

/* Change my headers to light instead of dark  */
body.sheet-darkmode h1,
body.sheet-darkmode h2,
body.sheet-darkmode h3,
body.sheet-darkmode h4,
body.sheet-darkmode h5 {
  color: var(--colorLight)
}

body.sheet-darkmode .header,
body.sheet-darkmode .charactersheet,
body.sheet-darkmode .campaignsheet,
body.sheet-darkmode .basesheet,
body.sheet-darkmode .hivebase::before,
body.sheet-darkmode .charactersheet section:not(.hiveroom),
body.sheet-darkmode .charactersheet main::before {
  background-color: var(--backgroundDark);
}

body.sheet-darkmode .basehead,
body.sheet-darkmode .header {
  background-color: var(--backgroundDark) !important;
}

body.sheet-darkmode .autoExpand + hr.underline + label {
  margin-top: 0px;
}

body.sheet-darkmode label.basecost {
  width: fit-content;
  margin-right: 50%;
}

body.sheet-darkmode input {
  accent-color: var(--gentleOrange);
}

body.sheet-darkmode .basetabstoggle[value="mainbase"] ~ div.tabholder > .mainbasebtn,
body.sheet-darkmode .basetabstoggle[value="subbase"] ~ div.tabholder > .subbasebtn,
body.sheet-darkmode .basetabstoggle[value="hivebase"] ~ div.tabholder > .hivebasebtn {
  background-color: var(--gentleOrange);
  color: black;
}

/* ... Omitted specific and unimportant sections ... */

/* Custom threat meters (you may remember these from the advanced CSS section) */

/* Dark Grief */

/* Labels after the one we've clicked */
body.sheet-darkmode .progressbar__radio:checked + label ~ label {
  color: var(--gentleOrange);
  background: transparent;
}

/* Every square that follows the one clicked */
body.sheet-darkmode .progressbar__radio:checked + label ~ label::before {
  background: var(--gentleOrange);
  border: 2px solid var(--gentleOrange);
}

body.sheet-darkmode .progressbar__radio:checked + label ~ label::after {
  background: #aaa;
}

/* The checked square */
body.sheet-darkmode .progressbar__radio:checked + label::before {
  background: var(--gentleOrange);
}

/* The checked label */
body.sheet-darkmode .progressbar__radio:checked + label {
  color: var(--gentleOrange);
  background: transparent;
}

/*Labels before the one we clicked*/
body.sheet-darkmode .progressbar__label {
  color: #aaa;
  background: transparent;
}

body.sheet-darkmode .progressbar__label::before {
    background: white;
    border: 2px solid var(--gentleOrange);
}


/* Dark Threat */
body.sheet-darkmode .threatbar:checked + label ~ label {
  color: #aaa;
}

body.sheet-darkmode .threatbar:checked + label ~ label::before {
  background: white;
  border-color: #aaa;
}

body.sheet-darkmode .threatbar:checked + label ~ label::after {
  background: #aaa;
}

body.sheet-darkmode .threatlabel {
  background: transparent;
  display: table-cell;
  font-weight: bold;
  position: relative;
  text-align: center;
  text-transform: uppercase;
}

body.sheet-darkmode .threatlabel::before {
  background: var(--gentleOrange);
  border: 2px solid var(--gentleOrange);
  bottom: calc((100% - 40px) - 2px);
  content: "";
  display: block;
  height: 20px;
  left: calc((50% - 1em) - 2px);
  position: absolute;
  width: 20px;
  z-index: 9;
  margin-left: 6px;
}

body.sheet-darkmode .threat1::before {
  background: var(--threatLevel1ColorDark);
  border-color: var(--threatLevel1ColorDark);
}
body.sheet-darkmode .threatlabel.threat1 {
  color: var(--threatLevel1Color)D50C59;
}

body.sheet-darkmode .threat2::before {
  background: var(--threatLevel2ColorDark);
  border-color: var(--threatLevel2ColorDark);
}
body.sheet-darkmode .threatlabel.threat2 {
  color: var(--threatLevel2Color);
}


body.sheet-darkmode .threat3::before {
  background: var(--threatLevel3ColorDark);
  border-color: var(--threatLevel3ColorDark);
}
body.sheet-darkmode .threatlabel.threat3 {
  color: var(--threatLevel3ColorDark);
}


body.sheet-darkmode .threat4::before {
  background: var(--threatLevel4ColorDark);
  border-color: var(--threatLevel4ColorDark);
}
body.sheet-darkmode .threatlabel.threat4 {
  color: var(--threatLevel4ColorDark);
}

body.sheet-darkmode .threatlabel.threat1,
body.sheet-darkmode .threatlabel.threat2,
body.sheet-darkmode .threatlabel.threat3,
body.sheet-darkmode .threatlabel.threat4 {
  background: transparent;
}
Templates are very similar, except that they have the property .sheet-rolltemplate-darkmode. I set some default properties, and then use the “and” CSS selector to change specific properties I care about.
1
2
3
4
5
6
7
8
9
10
11
12
13
14
15
16
17
18
19
20
21
22
23
24
25
26
27
28
29
30
31
32
33
34
35
36
37
38
39
40
41
42
43
44
45
46
47
48
49
50
51
52
53
54
55
56
57
58
59
/* Dark templates  */
 /* Set properties, then use a dark version of the background-image */
.sheet-rolltemplate-darkmode {
  --greenDark: #689d6a;
  --redDark: #cc241d;
  --blueDark: #458588;
  --lightOffset: #d5c4a1;
  --darkText: #3c3836;
  background-image: url("https://raw.githubusercontent.com/roll20/roll20-character-sheets/master/Cyberrats/paper-bg-dark.jpg""https://raw.githubusercontent.com/roll20/roll20-character-sheets/master/Cyberrats/paper-bg-dark.jpg");
}


/* Begin Dark Attribute */

/* Apply to elements with BOTH of these classes. */
.sheet-rolltemplate-darkmode.sheet-rolltemplate-attributeroll {
  border: 3px solid var(--lightOffset);
}

.sheet-rolltemplate-darkmode.sheet-rolltemplate-attributeroll .sheet-cybertitle {
  color: var(--greenDark);
}

.sheet-rolltemplate-darkmode.sheet-rolltemplate-attributeroll .sheet-smashtitle {
  color: var(--redDark);
}

.sheet-rolltemplate-darkmode.sheet-rolltemplate-attributeroll .sheet-slytitle {
  color: var(--blueDark);
}

.sheet-rolltemplate-darkmode.sheet-rolltemplate-attributeroll .sheet-reprecussion {
  color: var(--redDark);
}

.sheet-rolltemplate-darkmode.sheet-rolltemplate-attributeroll .sheet-success {
  color: var(--greenDark);
}


.sheet-rolltemplate-darkmode.sheet-rolltemplate-attributeroll .sheet-main-roll {
  font-size: 1.2em;
  text-align: center;
  margin-right: 5px;
  margin-bottom: 5px;
}
.sheet-rolltemplate-darkmode.sheet-rolltemplate-attributeroll .sheet-main-roll .inlinerollresult {
  font-size: 1.3em;
  padding-left: 4px;
}

.sheet-rolltemplate-darkmode.sheet-rolltemplate-attributeroll .inlinerollresult {
  border: none !important;
  background-color: var(--lightOffset);
  color: var(--darkText)
}

/* End Dark Attribute */
Change your default sheet settings
I won’t go into a lot of detail, because frankly I just learned about this feature minutes ago. You can set up default settings in your custom sheet.
This is useful for GMs, so they can change certain settings once and have those settings apply to every character sheet. For example, the Cyberrats Character sheet could have used a default setting to expose the “Briny Bastards” setting, so a GM doesn’t have to manually click it, or ask their players to. They could simply set up a game and check it once.
There is no way to use default settings on a character sheet that has not been submitted to Roll20, that is you cannot test these settings with your own custom sheet, they should be added after the sheet is approved.
See the Roll20 Wiki or the Roll20 help pages for more details.
Summary
There you have it! You know most of the tricks and tips that I know, and are ready to publish your character sheet! Let’s learn how in the next session.